I've been busy making graduation cards and Mother's Day cards. I have a few more Mother's Day cards to make, hopefully I can get those done tomorrow and get the out of town ones in the mail. They are probably going to be late. :( Oh, did a birthday card too. I've got one more birthday card to do too.
I will post them later.
Tuesday, May 5, 2009

Saturday, May 2, 2009
A Muse Cards, Birthday RAK, Bumper Card
One day this past week, I dropped the drawer that holds my A Muse stamps. Gerry picked them up for me and then I had to organize them again. I decided to make some cards with stamps I either haven't used or it has been a while since I used them last.
This hula girl is one that was among the first A Muse stamps I purchased yet I hadn't used it. It is very simple. I thought it needed something more so I added a couple of Prisma flowers.
 Of course, adding the flowers made it no longer an "A Muse" card. I used a dew drop in the middle of the flowers. The card base is red.
 I mentioned a new product called "Smooch" in an earlier post. I got a few bottles of it and used the red and green on these strawberries. Don't know if you can tell, the strawberries have a pearlized finish. I really like this product. I got red, green, blue, white and gold.
 I love this flower cart. I used turquoise Stickles on the canopy of the cart and put a clear twinkle sticker in the center of the cart wheel. Another really simple card. That's the beauty of A Muse cards, they are simple yet cute.
 I cased the layout of this card I made for a Birthday RAK from Dawn's Stamping Studio. She does a video each day on her blog of the project she is making for that day. She made this as a thank you card. I actually changed it somewhat. She had the front of the card cut back to an inch and a half and after putting on the strips and butterfly, the inside of the card was exposed quite a bit. I wanted to write inside of the card and didn't want it to show so I cut the front a little wider. I used a Martha Stewart border punch to do the white strip. Then a piece of cardstock from Basic Grey. The stamps are Stampin Up from three different sets. I hope the person receiving it likes the card. Thought it turned out pretty good. I think if I make it again, I'll use a Martha Stewart butterfly punch instead of the stamp. I used my Copics to color before I cut the butterfly out.
 Here is the bumper card I received yesterday. This little skunk is super cute.
This hula girl is one that was among the first A Muse stamps I purchased yet I hadn't used it. It is very simple. I thought it needed something more so I added a couple of Prisma flowers.
 Of course, adding the flowers made it no longer an "A Muse" card. I used a dew drop in the middle of the flowers. The card base is red.
 I mentioned a new product called "Smooch" in an earlier post. I got a few bottles of it and used the red and green on these strawberries. Don't know if you can tell, the strawberries have a pearlized finish. I really like this product. I got red, green, blue, white and gold.
 I love this flower cart. I used turquoise Stickles on the canopy of the cart and put a clear twinkle sticker in the center of the cart wheel. Another really simple card. That's the beauty of A Muse cards, they are simple yet cute.
 I cased the layout of this card I made for a Birthday RAK from Dawn's Stamping Studio. She does a video each day on her blog of the project she is making for that day. She made this as a thank you card. I actually changed it somewhat. She had the front of the card cut back to an inch and a half and after putting on the strips and butterfly, the inside of the card was exposed quite a bit. I wanted to write inside of the card and didn't want it to show so I cut the front a little wider. I used a Martha Stewart border punch to do the white strip. Then a piece of cardstock from Basic Grey. The stamps are Stampin Up from three different sets. I hope the person receiving it likes the card. Thought it turned out pretty good. I think if I make it again, I'll use a Martha Stewart butterfly punch instead of the stamp. I used my Copics to color before I cut the butterfly out.
 Here is the bumper card I received yesterday. This little skunk is super cute.
Last night I found some Close To My Heart stamps I purchased a long time ago and have never used. I stamped each one on a scrap piece of white cardstock so I know what they are and can start using them. They are unmounted rubber stamps that I had to put some sticky stuff on the back and then use the clear blocks with them. I need to get some more of the sticky stuff (can't remember what it is called. I'm sure I'll recognize the bottle when I see it. Got it at Michael's) and redo the backs of each one.
Sunday, April 26, 2009
Oops, I forgot!!
I had a few kits left over for the card I made for the card swap. I made up one of them and sent it to Jalna. If you read my other blog, you would have seen that Jalna sent me a goody box of all kinds of Japanese treats. I thanked her via email and in a post on my other blog, however I hadn't sent her card. I was reminded of my forgetfulness when I made the card for her sister.
And then I forgot to include it in my previous post. So my deepest apologies, Jalna, I hope you liked your card too!! I'm blaming it on "senior moments"!! :)
Jalna use to do a lot of stamping and she posted some of her cards on her blog. Leslie, another blog friend, use to be a Stampin Up demonstrator and Jalna's cards were Stampin Up stamps. They were all fantastic!! I try to encourage both she and Les to do some more. They are both pretty involved in their photography. Their blogs are listed on my sidebar if you care to look. Leslie and her husband are in Argentina right now.
I'm going to try and get some stamping done today, hopefully!! :)
And then I forgot to include it in my previous post. So my deepest apologies, Jalna, I hope you liked your card too!! I'm blaming it on "senior moments"!! :)
Jalna use to do a lot of stamping and she posted some of her cards on her blog. Leslie, another blog friend, use to be a Stampin Up demonstrator and Jalna's cards were Stampin Up stamps. They were all fantastic!! I try to encourage both she and Les to do some more. They are both pretty involved in their photography. Their blogs are listed on my sidebar if you care to look. Leslie and her husband are in Argentina right now.
I'm going to try and get some stamping done today, hopefully!! :)
Saturday, April 25, 2009
Card Projects
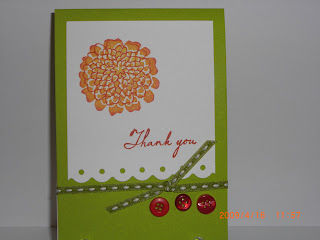
This first card is a Thank You card I made for Didi who is the sister of my blogger friend Jalna. Didi has written 2 cookbooks and Jalna had posted some recipes on her blog from one of Didi's cookbooks. I asked where I could purchase the cookbooks and the next thing I know, I'm getting an email from Didi asking for my address. She sent me both of her cookbooks. Wow, I was surprised and delighted to receive them. I've already looked them over and marked a few recipes I want to try. The card is all A Muse products. The cardbase is a yellow polka dot pattern. The ribbon and scalloped circle are turquoise. I used Copic markers to color the bouquet of flowers. Hope she liked it.
 This is the bumper card I received for April. It is also an A Muse card base. The photo is of a butterfly in a garden. I emailed the sender and asked if she took the photo. As I've posted before, I love butterflies. I turned the flash off on my camera because it made the butterfly blurry, however now it is hard to see. Oh well. A photographer I am not!! I love the card!!
 Here is the gift card holder make 'n take that I made at The Paper Garden yesterday. I think the stamp used is an A Muse stamp. The card base is A Muse. I think the border punch is by Martha Stewart. Copics were used to color the flower and leaves.
 Here is the inside of the card. It can be adapted to whatever you wanted. I know it is hard to see, the tiny apple was colored using a new product by Clearsnap called "Smooch". It comes in 8 different colors and is bottled in a nail polish looking bottle. So cute packaging!! Anyway you paint it on and it dries with a pearlized finish. I am going to have to get some for myself to use. After I got home I thought of a card to make that would be perfect for using the Smooch on. (Is that not the cutest name for a product)!!! :)
 The card is all A Muse products. The cardbase is a yellow polka dot pattern. The ribbon and scalloped circle are turquoise. I used Copic markers to color the bouquet of flowers. Hope she liked it.
 This is the bumper card I received for April. It is also an A Muse card base. The photo is of a butterfly in a garden. I emailed the sender and asked if she took the photo. As I've posted before, I love butterflies. I turned the flash off on my camera because it made the butterfly blurry, however now it is hard to see. Oh well. A photographer I am not!! I love the card!!
 Here is the gift card holder make 'n take that I made at The Paper Garden yesterday. I think the stamp used is an A Muse stamp. The card base is A Muse. I think the border punch is by Martha Stewart. Copics were used to color the flower and leaves.
 Here is the inside of the card. It can be adapted to whatever you wanted. I know it is hard to see, the tiny apple was colored using a new product by Clearsnap called "Smooch". It comes in 8 different colors and is bottled in a nail polish looking bottle. So cute packaging!! Anyway you paint it on and it dries with a pearlized finish. I am going to have to get some for myself to use. After I got home I thought of a card to make that would be perfect for using the Smooch on. (Is that not the cutest name for a product)!!! :)
Thanks for looking and please leave a comment!!! Thank you!!
Sacramento Card Swappers
At our card swap last week Saturday we talked about how often we would like to have a swap. It has been decided that they will held every 2 months. Three of them will be a large group gathering, the number attending limited to how large a space we have available. It will be decided by the hostess as to whether or not the large group swaps will have a card theme. Then there will be 3 focus swaps which be limited to under 15 people. The hostess will decide on a focus for that particular swap.
The next swap is scheduled for July 11th. It was to be held in June, however the hostess had some conflicts with scheduling a date. So then the August swap will be at the end of August. I will be hosting that one and will reserve the clubhouse at our mobile home park to have the swap.
The focus for the July swap will be doing a technique of some sort on a card made with only Stampin Up stamps and embellishments. The technique can be wet or dry embossing, bleaching, using baby wipes or any other technique the hostess wants to focus on. The first 12 paid will be guaranteed a spot. I mailed my check today, however haven't thought of a technique yet to demonstrate. I still have a couple of months to decide. There will be a potluck for lunch.
The August swap will be a holiday cards theme, ie Thanksgiving, Christmas or Halloween. I have not been able to reserve a date yet with the park manager. She is in the office every day at the beginning of each month and during the rest of the month she is not always there.
We are also going to put up a blog for our group and do a Birthday RAK for those that want to participate. Right now we are suppose to be thinking of a name to call ourselves.
I am looking forward to participating in more of these swaps. The first one was a lot of fun!
The next swap is scheduled for July 11th. It was to be held in June, however the hostess had some conflicts with scheduling a date. So then the August swap will be at the end of August. I will be hosting that one and will reserve the clubhouse at our mobile home park to have the swap.
The focus for the July swap will be doing a technique of some sort on a card made with only Stampin Up stamps and embellishments. The technique can be wet or dry embossing, bleaching, using baby wipes or any other technique the hostess wants to focus on. The first 12 paid will be guaranteed a spot. I mailed my check today, however haven't thought of a technique yet to demonstrate. I still have a couple of months to decide. There will be a potluck for lunch.
The August swap will be a holiday cards theme, ie Thanksgiving, Christmas or Halloween. I have not been able to reserve a date yet with the park manager. She is in the office every day at the beginning of each month and during the rest of the month she is not always there.
We are also going to put up a blog for our group and do a Birthday RAK for those that want to participate. Right now we are suppose to be thinking of a name to call ourselves.
I am looking forward to participating in more of these swaps. The first one was a lot of fun!
Sunday, April 19, 2009
The First Sacramento Area Shoebox Card Swap
Saturday, April 18th, 15 ladies from around the Sacramento area gathered at the home of Candace in Rancho Cordova for the first shoebox card swap. Unfortunately, a few ladies that signed up could not make it. We had a great time, putting cards together, eating and getting to know each other.
A majority of the ladies are Stampin Up demonstrators and are members on SplitcoastStampers, an online website for stampers and other paper crafters. A few brought friends.
Each lady was to make up a sample card, bring enough kits for each lady attending to make their card and it was to be brought in a shoebox or basket. Then at the swap we assembled the cards. Here is a picture of those attending. I don't remember the names of 3 of the ladies; I will introduce you to the others. Not in this picture are the hostess Candace (she went to get a neighbor to take a picture of us) and myself.
Note: If you click on each picture, you will be able to see the picture a lot better. I just found this out myself. :)
 In the front row, left to right is Twila from Esparto (she has lost over 100 lbs), Deb from Elk Grove (we have the same last name), and Renee from Woodland. Behind Twila is Jo from Elk Grove. Behind Jo is Nancy from Woodland (she is a friend of Renee's and she rode in to Sacramento with Twila and Renee), then Meg from Folsom. In the next row is left to right Julie and Connie (she's Jo's friend). In the next row left to right is Michelle (my friend) and Kimberly. I don't remember the names of the last 3 ladies. Everyone pictured are SU demonstrators except for Jo, Connie, Michelle and myself. Candace (not pictured) is also a demonstrator.
The first project we did is Jo's contribution. It is a little bag made with SU products. A small paper bag in the middle has some sample lotions in it. The ribbon tying the handles together is a yellow stripe with a piece of light blue tied around it. Here's a side view of it.
 This is Deb's contribution. A very nice 4th of July card. Stickles were put on the flame from the firecracker. A red brad was used to dot the "i" in America. Love this card! Deb and her husband have a design studio in their home working with glass and beads. She is doing the next swap at her home.
 Here is a side view of the inside of the card.
 I don't remember the name of the person who did this card. I finished this card at home. I couldn't get the ribbon to work like it was suppose to so when I got home I cut a piece of it and taped it around the middle of the butterfly. Then I took the other piece and tied it around to try and make the butterfly's antennae. Not sure it works or not. Loved the paper used for the butterfly.
 This next card is Candace's contribution. I finished this one at home too. I tore the bottom of the white piece and then added some ribbon. The color is a darker green, I think it looks okay. If I decide to use the card, I can stamp a sentiment on the bottom of the green piece.
 This is Kimberly's contribution. A very unique card, Kimberly actually cut little squares of the two yellow papers and then adhered them to cardstock before cutting out the diecut. A few of the projects used this SU diecut. A really cute card.
 I absolutely love this card. I don't remember the name of the person who made this card. I actually finished it at home. I wanted to pop up the hummingbird and sentiment layers. The colors go together so well.
 This next one was made by Julie. She actually downloaded the image from a website called Papercrafter.com (I think). Another great color combination. I left the circle layers off and when I got home, I stamped a sentiment on it and then used some foam tape to adhere it. I noticed on Splitcoast this morning that Meg was asking where Julie got the image again, one of Meg's customers wanted to make the card. I haven't checked out the website yet.
 I don't remember the name of the person who made this card either. I had a little bit of trouble with this one and finished it at home too. The stems had to be shortened and there are words on the stems. I messed them up so you can't see them. There was also some ribbon that was suppose to go on one of the stems, I ended up leaving it off.
 This next card was made by Connie. I had trouble with this one too and yes, I finished it at home. The dp and cardstock met in the middle and then the ribbon was taped over the middle and adhered in the back. It wouldn't stay on. Thankfully I didn't royally mess it up. :)
 This gatefold card was made by Renee. Love this card too. Very simple yet elegant. Renee didn't have her kits together, so those of us sitting at the same table helped her get them together.
 This is Michelle's card. Some years ago she went to Pennsylvania with one of our friends from church and she made up a bunch of cards so she could send her husband a card every day. This is one of the designs she made. I really love this card, simple yet adorable! (And I'm not saying it because its Michelle). She actually stamped all those hearts and the design separating the rows of hearts. That was time consuming. She said she enjoyed herself at the swap. I'm glad, I love having her around!
 Twila made this next card. This one is very nice! The lily has a shiny finish to it. I think she said she used Crystal Effects on it which gives a glossy finish.
 This next one is Nancy's contribution. Very feminine and soft looking. The card is pink and white. Another favorite! She did some embossing on the white card, I'm not sure what she said she used. I don't think its a Cuttlebug embossing folder. The flower is actually 3 different pieces.
 Here's Meg's card. Another pink and white card and again very soft and feminine. The butterflies are adorable. Love this card too.
 These next 2 projects were things that Nancy made. Some of the girls brought things that they made. These are folders that include cards and matching envelopes. I want to try and make one of these. They look pretty simple.


 And saving the best for last and as I promised, here is my card: :)
 I stamped the half egg shell that the chick is sitting in on the other side of the same designer cardstock I used for the peach panel and then cut it out. I used some foam tape to pop it up on the stamped image and colored everything with Copics. A very soft spring card! I love the way it turned out.
 Here's a closeup of the egg.
A majority of the ladies are Stampin Up demonstrators and are members on SplitcoastStampers, an online website for stampers and other paper crafters. A few brought friends.
Each lady was to make up a sample card, bring enough kits for each lady attending to make their card and it was to be brought in a shoebox or basket. Then at the swap we assembled the cards. Here is a picture of those attending. I don't remember the names of 3 of the ladies; I will introduce you to the others. Not in this picture are the hostess Candace (she went to get a neighbor to take a picture of us) and myself.
Note: If you click on each picture, you will be able to see the picture a lot better. I just found this out myself. :)
 In the front row, left to right is Twila from Esparto (she has lost over 100 lbs), Deb from Elk Grove (we have the same last name), and Renee from Woodland. Behind Twila is Jo from Elk Grove. Behind Jo is Nancy from Woodland (she is a friend of Renee's and she rode in to Sacramento with Twila and Renee), then Meg from Folsom. In the next row is left to right Julie and Connie (she's Jo's friend). In the next row left to right is Michelle (my friend) and Kimberly. I don't remember the names of the last 3 ladies. Everyone pictured are SU demonstrators except for Jo, Connie, Michelle and myself. Candace (not pictured) is also a demonstrator.
The first project we did is Jo's contribution. It is a little bag made with SU products. A small paper bag in the middle has some sample lotions in it. The ribbon tying the handles together is a yellow stripe with a piece of light blue tied around it.
 Here's a side view of it.
 This is Deb's contribution. A very nice 4th of July card. Stickles were put on the flame from the firecracker. A red brad was used to dot the "i" in America. Love this card! Deb and her husband have a design studio in their home working with glass and beads. She is doing the next swap at her home.
 Here is a side view of the inside of the card.
 I don't remember the name of the person who did this card. I finished this card at home. I couldn't get the ribbon to work like it was suppose to so when I got home I cut a piece of it and taped it around the middle of the butterfly. Then I took the other piece and tied it around to try and make the butterfly's antennae. Not sure it works or not. Loved the paper used for the butterfly.
 This next card is Candace's contribution. I finished this one at home too. I tore the bottom of the white piece and then added some ribbon. The color is a darker green, I think it looks okay. If I decide to use the card, I can stamp a sentiment on the bottom of the green piece.
 This is Kimberly's contribution. A very unique card, Kimberly actually cut little squares of the two yellow papers and then adhered them to cardstock before cutting out the diecut. A few of the projects used this SU diecut. A really cute card.
 I absolutely love this card. I don't remember the name of the person who made this card. I actually finished it at home. I wanted to pop up the hummingbird and sentiment layers. The colors go together so well.
 This next one was made by Julie. She actually downloaded the image from a website called Papercrafter.com (I think). Another great color combination. I left the circle layers off and when I got home, I stamped a sentiment on it and then used some foam tape to adhere it. I noticed on Splitcoast this morning that Meg was asking where Julie got the image again, one of Meg's customers wanted to make the card. I haven't checked out the website yet.
 I don't remember the name of the person who made this card either. I had a little bit of trouble with this one and finished it at home too. The stems had to be shortened and there are words on the stems. I messed them up so you can't see them. There was also some ribbon that was suppose to go on one of the stems, I ended up leaving it off.
 This next card was made by Connie. I had trouble with this one too and yes, I finished it at home. The dp and cardstock met in the middle and then the ribbon was taped over the middle and adhered in the back. It wouldn't stay on. Thankfully I didn't royally mess it up. :)
 This gatefold card was made by Renee. Love this card too. Very simple yet elegant. Renee didn't have her kits together, so those of us sitting at the same table helped her get them together.
 This is Michelle's card. Some years ago she went to Pennsylvania with one of our friends from church and she made up a bunch of cards so she could send her husband a card every day. This is one of the designs she made. I really love this card, simple yet adorable! (And I'm not saying it because its Michelle). She actually stamped all those hearts and the design separating the rows of hearts. That was time consuming. She said she enjoyed herself at the swap. I'm glad, I love having her around!
 Twila made this next card. This one is very nice! The lily has a shiny finish to it. I think she said she used Crystal Effects on it which gives a glossy finish.
 This next one is Nancy's contribution. Very feminine and soft looking. The card is pink and white. Another favorite! She did some embossing on the white card, I'm not sure what she said she used. I don't think its a Cuttlebug embossing folder. The flower is actually 3 different pieces.
 Here's Meg's card. Another pink and white card and again very soft and feminine. The butterflies are adorable. Love this card too.
 These next 2 projects were things that Nancy made. Some of the girls brought things that they made. These are folders that include cards and matching envelopes. I want to try and make one of these. They look pretty simple.

 And saving the best for last and as I promised, here is my card: :)
The card base is peach with a white layer that I used the Cuttlebug Swiss Dots embossing folder on. I used a piece of designer cardstock for the peach layer and bordered it with Fiskars "threading water" punch.
 I stamped the half egg shell that the chick is sitting in on the other side of the same designer cardstock I used for the peach panel and then cut it out. I used some foam tape to pop it up on the stamped image and colored everything with Copics. A very soft spring card! I love the way it turned out.
 Here's a closeup of the egg.
We will be having these swaps every 2 months. The next one is the end of June and it will be a focus swap, so the hostess will pick a theme or technique and it will be a smaller group. I am hosting the August swap here at the clubhouse of our mobile home park. It will be a holiday swap, so we will do Thanksgiving, Christmas and Halloween cards.
I had a great time and looking forward to the future swaps. This has been a really long post so I hope you stuck with me to the end. :)
Bumper Cards & Birthday RAK Cards
The first 3 cards I received from Sherry of New Jersey as bumper cards this month. They are all really cute. On the first one she used a white brad for the golf ball. I really like this one. She used 2 new A Muse stamps, an open zinnia and a closed zinnia and stamped one on top of the other. The border is probably the Fiskars "threading water" border punch. Simple yet very nice.
 This one is my favorite of the three cards. She used another new A Muse stamp, its a cherry blossom branch and a tiny bird. What I like about this card is that she stamped on a piece of clear acetate and then mounted it on a piece of white cardstock. The pink strip was embossed with a Cuttlebug embossing folder and the green piece has a scalloped edge. The card base is a light aqua.
 This next card I made for another birthday RAK for someone that lives in southern California. I used a Cuttlebug embossing folder on the aqua piece. I like the softness of it and very springy.
 I made this post-it note holder some time ago and hadn't given to anyone yet. So I decided to dress it up a little by adding some prima flowers and then the ribbon on the coils. So this will go with the birthday card as part of the RAK.
 I made up this card thinking that I would use it as my April bumper card to send out. We are suppose to use A Muse or Saltbox stamps. Well, the chick stamp is from Elyzbells, however, the sentiment stamp is an A Muse stamp. So I may just go ahead and use it unless I come up with something else. After I got it together I thought it needed something else so I added the yellow brads on the four corners. I think it turned out alright - simple and springy!
 I used Copics to color all the images.
 I really like this one. She used 2 new A Muse stamps, an open zinnia and a closed zinnia and stamped one on top of the other. The border is probably the Fiskars "threading water" border punch. Simple yet very nice.
 This one is my favorite of the three cards. She used another new A Muse stamp, its a cherry blossom branch and a tiny bird. What I like about this card is that she stamped on a piece of clear acetate and then mounted it on a piece of white cardstock. The pink strip was embossed with a Cuttlebug embossing folder and the green piece has a scalloped edge. The card base is a light aqua.
 This next card I made for another birthday RAK for someone that lives in southern California. I used a Cuttlebug embossing folder on the aqua piece. I like the softness of it and very springy.
 I made this post-it note holder some time ago and hadn't given to anyone yet. So I decided to dress it up a little by adding some prima flowers and then the ribbon on the coils. So this will go with the birthday card as part of the RAK.
 I made up this card thinking that I would use it as my April bumper card to send out. We are suppose to use A Muse or Saltbox stamps. Well, the chick stamp is from Elyzbells, however, the sentiment stamp is an A Muse stamp. So I may just go ahead and use it unless I come up with something else. After I got it together I thought it needed something else so I added the yellow brads on the four corners. I think it turned out alright - simple and springy!
 I used Copics to color all the images.
Subscribe to:
Posts (Atom)


 Posts
Posts