Linda Carnell, the owner of A Muse Art Stamps in Seattle, WA, was in Sacramento this past weekend. She taught a few classes at The Paper Garden Boutique located in Town & Country Village. This is the stamp store that I purchase a lot of my stamp supplies from and have taken several classes here too.
I signed up for two classes to be held on Saturday. There was an opening in the third class she was teaching so I decided to take it also. I've actually gotten the pictures out of order. The first group of pictures was actually the second class she taught entitled Linda's Favorites. I will say that the cards have a lot of mistakes on them. They are samples so I'm not too concerned about it. On this first card, the butterfly was punched out using a piece of vellum paper. Then we put the butterfly through a Xyron Adhesive machine so it was sticky on one side and then we dipped the butterfly in glitter. I think this machine is going to be my next toy.

On this card, we stamped the leaves on the card base first. Then stamped them again on the white square and punched that out using a fancy square punch by Marvy. Then we stamped the flower and sprinkled Simple Stick liberally on the flower, took the powder off and heat set it from the back just until it started to turn. I used the heat gun just a second too long on the center of the flower. Then we dipped the flower in glitter and shook a little of the glitter off. When the card is turned sideways, it is glittery all over, looking at it right side up, the center looks like there is no glitter on it. We used a Fiskars border punch on the pink checked strip.

This card would have been so pretty if I had done it correctly. The huge flower was stamped first. Then using some sticky tape, we stamped just a part of the petals on the sticky tape. We were suppose to cut around the petals, put the tape over the flower and stamp the other three images. I forgot to cut my mask. :( Then we used a chalk pencil and colored in the petals a little, then using a finger tip, we pulled some of the chalk down over the rest of the petals. It depended on the amount of chalk used on the petals as to how light or dark the flower would be. These chalk pencils are rather expensive so I am going to check out Michael's and see if they carry them and then use a 40% coupon. The Paper Garden sells them for about $30 for a set of 12 pencils.

On this card, the whale was paper pieced. We stamped the wave first, stamped the whale on a separate piece of cardstock and then cut it out. The waves at the top were done with a Fiskars border punch. Then we used 2 different Copic markers to color in the wave.

On this card, we stamped the center first and punched out the flower with a Marvy flower punch. There are 2 flowers, punched a small hole in the middle and used a brad to join the 2 flowers together. The ends of the flower are curled up; we were instrusted to use the end of our scissors to curl the petals up. A bone folder could also be used. I did it by using my finger nails. The leaves were stamped first on the white.

The last card of this class was made with 3 different colors of cardstock and three different border punches. Two of them were by Fiskars and one was a Martha Stewart border punch. After we punched out the edges, we cut between the scallops and curled up the ends. We made 6 cards in this class.

This next group of pictures was actually the first class called Fabulous Folds. The first card is an easel card. The color scheme is a light lavender with green. Um, I thought I took a front view of this card. I probably forgot to upload it. :)

The next one is a tri-fold. The cardstock was scored at 3 inches for two panels with the third panel being 3 and a half inches. We used a tag punch to punch out the shape in the middle panel. The grass was stamped through the opening and then opened up to stamp the flowers. The little snail is one of the new A Muse stamps for spring. A Fiskars border punch was used on the bottom edge. This is not a very good picture, hopefully you get the idea.

And here's the card opened up.

On this card, there is a strip of pink checked card stock that we scored at 1/2 inch and 1 inch across the length of the strip. Then it was folded to form pleats, taped all together and used a pinking shears to finish off the edge. It would have been better to pink the edges before folding it and taping it together. The edge looks really rough. I tried to take a side view so you could see how it looks, however it didn't work real well.

This last card was a little difficult to do and in fact, Linda did some surgery on my card. We had 2 strips of cardstock 1 1/2 inches by 11 inches. We used a Fiskars border punch to punch the edges of both strips. Then we folded the strips between the scallops and taped the strips together. We had 2 orange circles. One orange circle was used on the back of the strips after they were gathered together to form a circle. Then the top orange circle and white circle were taped to the top of this circle. We had to use lots of score tape to hold everything together. Oh, we stamped a flower on the base first so we'd have a stem. This is a clever idea, don't know if I'd want to attempt doing this again.

Here's a closeup of that folded circle flower.

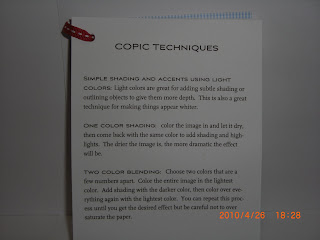
The last class Linda taught on Saturday was a class using the Copic markers. I wasn't going to take it, however she had a cancellation and decided to go ahead and do it. She had this little booklet all made up for us.

She had some general information included in the booklet.
Then a few pages of images to practice using the Copics. This first practice page was using a light color to highlight an image like the clouds and buildings. I do this on some of my cards.

This was using one color to do blending and shading. The green dress is close to what it should be using this application. You are suppose to figure out where the light source is coming from and the area away from the light source is darker. I didn't do very well with the rest of the images.

This is 2 color blending. The first birdhouse is a good example.

The next practice was using a blender pen which is filled with alcohol. If two or more classes were taken, we received a free blender pen. For those that had a blender pen already, they could pick out another color pen from the store. We took a dark color and made a large rectangle and then using the broad end of the blender pen, made bricks. The picture will have to be enlarged to see it. On the next one, we made circles and then held the blender pen in the middle of the circle. I don't have a good example; this method can be used for do rain drops. And the last one, we used two different colors, a blue and a green. One mermaid's tail was first colored with green and the other with blue. Then we used the blue over the green and the green over the blue. Then using the blender pen drew through the scales on her tail. It was suppose to change to different colors. I didn't see any difference and it bled out of the image.

This last practice was pretty cool. Using two different colors, 1 a dark and the other a light. Taking the tip of the dark, we held it over the broad tip of the light and color was transferred from the dark to the light. This method is a good way to make grass or fire from a camp fire or even rays from the sun. It just takes a little bit of ink to do this and it doesn't hurt either marker.

She then went over the different types of Copics of which I have all three. The first one is called Ciao, its round and is the least expensive of the three. The next one is a sketch marker, oval in shape and has the most colors, over 300. The third one is an Original, square in shape and is the only one of the 3 with a fine nib on one end. This one also has the most interchangeable nibs, 10 I think she said.

The original has a small nib on one side and a broad nib on the other with a point on one side of the nib.

The original and ciao markers have the same type of nibs on both ends.

This is the ciao.

And to compare the looks of the Copic markers, here is a Stampin' Up marker. They have a brush nib on one side and a really small nib on the other.


The Copic markers are alcohol based and the Stampin' Up markers are water based. I prefer the Copic markers over the Stampin' Up markers because when color is laid down on an image, it does not streak and the paper does not pill up. Not all inks will work with the Copic markers so if the correct ink is used, it won't bleed out of the lines of the image. It will bleed through the paper to the back of the image. That doesn't matter since it will be covered with another layer of cardstock. I will do another post tomorrow with a card that I used Stampin Up markers on showing that the results were not as good.
The Copic markers are expensive, the Ciao about $4.00 each and the Sketch and Original markers about $6 or $7. I look for them on sale on the internet.
I am finishing up this post on Tuesday, 4/27. I started it last night and was too tired to proof read and post.
 The recipe: Stampin Up stamp set "Do the Hula", card stock from The Paper Garden, designer paper from Michael's, Memento ink Rich Cocoa and Tangelo, Sakura clear glitter gel pen on hibiscus and SU ribbon.
 The recipe: Kraft cardstock from SU, the blue layer is generic. I ran it through the Cuttlebug with one of my embossing folders. I used Copics to color and added a tiny crystal gem sticker to the center of the flower in her hair. The stamps are all A Muse. I used a small Fiskars circle punch for the sun and popped it up with foam tape. The ribbon is SU.


 Posts
Posts