Over the last 2 days I have posted several new items. This is all that I've been working on for the last few weeks. Hope it makes up for not posting for several weeks.
Some time ago I downloaded a thing on the blog to show me when people visit the blog and where the visit originates. I have been pleasantly surprised to see how many visits there has been since I put this thing on the blog, up to 369 the last time I looked. Mostly I've been surprised as to where the visits are originating, from Europe, Mexico, South America, British Columbia. There's also been a lot from different states besides California, the east coast, the south, etc. Several people have found my blog in searching for my daughter and son-in-law's coffee shop in Enterprise, AL. A lot of them have been in searching for a particular item and my blog has been one of the choices. However, a lot of them have come from blogger.com. I've been really excited in all of this, however, it would be even more exciting if comments were left too. Someone said on their blog that comments put a smile on their face!!
So for anyone reading the posts on the blog, please leave a comment. I would be so grateful if you did. I started the blog to showcase my cards and sell them, however, family events have found their way to the blog too. Which is ok!! So if you are interested in purchasing anything I have on the blog, please do not hesitate to contact me by leaving a comment.
I have one more item to post, will save that for next week. It's a birthday card for a friend whose birthday is on Monday so I don't want her to see it before then. LOL!
Thank you to all of you who have visited my blog! Remember, leave me a comment when you do!! :)
Have a blessed day!!
Friday, November 21, 2008
Asian Card Order
A couple that eats lunch each Tuesday at the Japanese restaurant where I also have lunch on Tuesdays requested that I make some Asian cards for them. They were my first customers when I started selling my cards the first of this year. I made a total of 9 cards and they purchased 7 of them. This first card has a brown card base, then a layer of black. I stamped a square shadow stamp in Memories Soft Sand ink and then stamped the 4 Kanji cubes in Creamy Brown chalk ink. Each of the symbols were outlined with a clear Spica glitter pen. The husband likes this particular card a lot so I have made several of this design for him over the last few months.
 This card has a piece of burgundy card stock as the first layer. Then I cut a piece of Ultra White card stock and mounted it onto the burgundy. The white is the actual card which opens on the right side. The cherry blossom stem was stamped twice in brown ink. I stamped the branch again several times on a piece of scrap white and cut out the flowers and put them over the flowers that I stamped first with a tiny piece of foam tape. I colored the flowers with a Sakura Glaze red pen. When this ink dries, it has a raised effect. I cuttlebugged about 1 inch of the edge of the white and tied a burgundy ribbon at the crease end. The ribbon is two-toned and is covering a mistake I made when I stamped the branch a second time. :) The stamp set is from SU.
 I have made this particular card using a peach and sage green color scheme and is posted in an older post. This card was done in sage green, lavender and plum. I colored the flowers in lavender. The corners were all rounded and the oval with the sentiment was edged in lavender and mounted with foam tape. A very classic card and perfect for a sympathy card.
 The card base of the card on the left is SU Groovy Guava. The layers are gold metallic, a square of Washi paper, another gold metallic layer and then white. I then stamped a Japanese flower on the white square with SU Groovy Guava ink and put some Stardust Stickles in the center of the flower. I actually CASED the design from a card sample at The Paper Garden.
 This first card has a brown card base, then a layer of black. I stamped a square shadow stamp in Memories Soft Sand ink and then stamped the 4 Kanji cubes in Creamy Brown chalk ink. Each of the symbols were outlined with a clear Spica glitter pen. The husband likes this particular card a lot so I have made several of this design for him over the last few months.
 This card has a piece of burgundy card stock as the first layer. Then I cut a piece of Ultra White card stock and mounted it onto the burgundy. The white is the actual card which opens on the right side. The cherry blossom stem was stamped twice in brown ink. I stamped the branch again several times on a piece of scrap white and cut out the flowers and put them over the flowers that I stamped first with a tiny piece of foam tape. I colored the flowers with a Sakura Glaze red pen. When this ink dries, it has a raised effect. I cuttlebugged about 1 inch of the edge of the white and tied a burgundy ribbon at the crease end. The ribbon is two-toned and is covering a mistake I made when I stamped the branch a second time. :) The stamp set is from SU.
 I have made this particular card using a peach and sage green color scheme and is posted in an older post. This card was done in sage green, lavender and plum. I colored the flowers in lavender. The corners were all rounded and the oval with the sentiment was edged in lavender and mounted with foam tape. A very classic card and perfect for a sympathy card.
 The card base of the card on the left is SU Groovy Guava. The layers are gold metallic, a square of Washi paper, another gold metallic layer and then white. I then stamped a Japanese flower on the white square with SU Groovy Guava ink and put some Stardust Stickles in the center of the flower. I actually CASED the design from a card sample at The Paper Garden.
The card next to it was made in an Asian card class at The Paper Garden. The stamp set is from Kodomo. It's a different set than what we used in class sample. The card was cut 4.25 inches by 11 inches and scored at 5.5 inches. I used Stardust Stickles on the Iris and the Kanji stamp. I cut a small slit in the top fold and threaded the ribbon through and then added the small square before tying the ribbon. The inks used are chalk.
 The card on the left was also done in an Asian card class. It's cut a little larger than usual. The three stamps used is part of a Kodoma stamp set. The gold cord was looped through the Asian coin then wrapped around the panel several times and tied in the back. Because the cord was bulky, I used foam tape to adhere the panel to a green card base. I cut a half of an inch from the front side of the card then used the 4th stamp from this set and stamped a border along the bottom edge. To get it straight I actually drew a faint line with a pencil to use as a guide for placement of the stamp. I stamped it in brown as were the three stamps on the colored squares.
  The card on the left has a black card base, a layer of white then a layer of red Stardust which is shimmery. Then a smaller square of black and a square of white. The stamp used is from Hanko. I colored 2 of the flowers with Copic red marker. On the black flowers I used a clear Spica glitter pen to outline the lines in the center of the flowers.
 The card on the left was also done in an Asian card class. It's cut a little larger than usual. The three stamps used is part of a Kodoma stamp set. The gold cord was looped through the Asian coin then wrapped around the panel several times and tied in the back. Because the cord was bulky, I used foam tape to adhere the panel to a green card base. I cut a half of an inch from the front side of the card then used the 4th stamp from this set and stamped a border along the bottom edge. To get it straight I actually drew a faint line with a pencil to use as a guide for placement of the stamp. I stamped it in brown as were the three stamps on the colored squares.
The card next to it has a brown card base. I cut a piece of Washi paper and adhered it on the left edge of the card. It has blues and golds with white cranes. The fans were stamped on white cardstock with Versamark and then embossed with gold embossing powder. I layered it with a piece of gold cardstock. The wife told me the fans were placed wrong, that the fans should be facing up. The card sample I CASED from The Paper Garden had the fans going down sideways. Of course the stamps that were used on that sample were individual fans on a cube. This stamp was one piece from Hanko.
I hestitate making Asian cards when they are requested from someone who is Asian, be it Japanese or Chinese. It's hard to know if something will be offensive to them. That is one of the reasons that most of the Asian cards I've made have been CASED from the samples at The Paper Garden. I try to change them a little so it's not an exact copy. One of the many things I like about this particular store is that there are tons of card samples and the customers are encouraged to bring a camera and take pictures of the samples.
 The card on the left has a black card base, a layer of white then a layer of red Stardust which is shimmery. Then a smaller square of black and a square of white. The stamp used is from Hanko. I colored 2 of the flowers with Copic red marker. On the black flowers I used a clear Spica glitter pen to outline the lines in the center of the flowers.
The next card has a gray card base, a black layer and another gray layer. The purple is a piece of Washi paper that has a design in it. The kimono is a sticker from Hanko. I cut 2 narrow stripes of gold paper and placed them on the side and then a small chop stamp on the bottom right corner that I stamped with black ink.
These cards are all for sale at $4.00 each.
Baby Cards
At our Holiday Gift Fair, my friend Dawn asked me to make 3 or 4 baby cards that she could use with a gift. Dawn's favorite color is purple and she wanted the cards to all be purple. So here are the four designs I came up with. All of the stamps are from SU sets. On the buggy one, there's a layer of designer paper. I am not sure where I found this, I've used it on several designs. There's a silk flower down in the corner with a flower brad in the middle of the flower and then a plain brad. Forgot I even had these. The card next to it has "congratulations" stamped on the four sides of the frame.
 The stamps used on the left are SU and the other one is a animal train stamp from "The Cat's Pajama's". Pretty simple and cute too.
 On the buggy one, there's a layer of designer paper. I am not sure where I found this, I've used it on several designs. There's a silk flower down in the corner with a flower brad in the middle of the flower and then a plain brad. Forgot I even had these. The card next to it has "congratulations" stamped on the four sides of the frame.
 The stamps used on the left are SU and the other one is a animal train stamp from "The Cat's Pajama's". Pretty simple and cute too.
Denise's Birthday Card
My daughter, Denise celebrated her birthday on November 11th. This is the card I made for her. The card base is a pale yellow with a grayish blue layer that I used the Cuttlebug on. The next layer is a piece of designer paper from Basic Grey. I stamped the butterfly on the paper then stamped it again on blue paper. I used a yellow Copic marker on parts of the butterfly then outlined the whole thing with a clear Spica glitter pen. An AMuse happy birthday stamp was used in bottom right corner. I used a tiny piece of foam tape on the back of the butterfly and folded up its wings so it looks like its in flight. I'm just crazy right now about using butterflies in my designs. I just love the way they look. I hope Denise liked her card, I haven't heard from her (she's a busy lady!!)
 I used a tiny piece of foam tape on the back of the butterfly and folded up its wings so it looks like its in flight. I'm just crazy right now about using butterflies in my designs. I just love the way they look. I hope Denise liked her card, I haven't heard from her (she's a busy lady!!)
Granddaughter Emily's 12th Birthday Party
Our granddaughter, Miss Emily Ann Strempke, celebrated her birthday on Saturday November 15th at the clubhouse here at the mobile home park where we live. Her mother, Elizabeth, is my husband's oldest and first born daughter. Emily's actual birthday was the 6th of November. Both of her sisters have had their birthday parties here. There is more room here than at their home. Her theme was crazy hats. Her mother made her birthday cake which is a three layered hat. Elizabeth is the official family cake maker.  The little guy standing next to her is Andy, our youngest grandson. And seated next to him is his sister Melody. Andy is 5 and a half and Melody is almost 8 and a half. One Thursday a month we pick up Andy from school, he's in kindergarten. We've picked up Melody occasionally too when there's been a conflict in schedules. When you're retired you can do things like this. Their mother is Jenni another of my husband's daughters. She has a twin Joyce who is the mother of our two youngest grandchildren and they live in So. California.
 This is the card I made for Emily. It was amazing that all the colors I used on her card were the colors she had in her decorations for her party. The stamps are all SU.
 Here's her table decoration. The craft fair that I am doing on December 12th is at the charter school where Emily goes. She's going to help me with it. Should be fun!!
 The little guy standing next to her is Andy, our youngest grandson. And seated next to him is his sister Melody. Andy is 5 and a half and Melody is almost 8 and a half. One Thursday a month we pick up Andy from school, he's in kindergarten. We've picked up Melody occasionally too when there's been a conflict in schedules. When you're retired you can do things like this. Their mother is Jenni another of my husband's daughters. She has a twin Joyce who is the mother of our two youngest grandchildren and they live in So. California.
 This is the card I made for Emily. It was amazing that all the colors I used on her card were the colors she had in her decorations for her party. The stamps are all SU.
 Here's her table decoration. The craft fair that I am doing on December 12th is at the charter school where Emily goes. She's going to help me with it. Should be fun!!
The Tree In Our Front Yard With Its Beautiful Fall Colors
I took these pictures one beautiful day before we left on our trip to the coast. When we came home, most of the leaves were on the ground. It seemed the leaves had more red in them this year than previous years and so I wanted to get pictures before they were all gone. I love the colors of fall!! I took this first one from the front porch looking towards the street. This one was from across the street looking towards the front door, well it's supposedly the front door. However, it's used to access the bicycle garage which is the screened in front porch. :)

This is also from across the street looking towards the neighbor's. The leaves covered the neighbor's carport at one time. They've been cleaned up since although there are still leaves covering the ground under the tree and the front walkway. The window showing is Gerry's office. My office/craft room is on the other side of the 20 foot flagpole. Both of these rooms were bedrooms that we converted to offices for both of us.

 This one was from across the street looking towards the front door, well it's supposedly the front door. However, it's used to access the bicycle garage which is the screened in front porch. :)
This is also from across the street looking towards the neighbor's. The leaves covered the neighbor's carport at one time. They've been cleaned up since although there are still leaves covering the ground under the tree and the front walkway. The window showing is Gerry's office. My office/craft room is on the other side of the 20 foot flagpole. Both of these rooms were bedrooms that we converted to offices for both of us.

An Anniversary Card and My Version
My daughter, Denise has done scrapbooking for years. She is a Creative Memories consultant. Occasionally she has made some cards too and they are always beautiful. On a recent trip to Fayetteville, NC where they lived for several years (they now live in Enterprise, AL), she and a friend made about 40 different cards. When I asked her to show me some, she didn't respond to my request. For our anniversary she sent us the beautiful card on the left in this picture. I looked at it and thought I could do something like that too. When I emailed her to thank her and compliment her on her card, she told me the designer paper was from Basic Grey. So I went through my stuff and decided on the design on the right. The designer paper on my card is also from Basic Grey. The stamp used in the square is from a SU set. I forgot to ask her how she did the flourish on her card. Unfortunately, I don't have anything like that. The colors in my card are greens, blues, rust and a dark red. I put a bronze charm in the right hand corner that says "Inspire". The colors in her card are blacks, orange and some gray. The black brads that she used look like they have some glitter in them. We both used a black card base.. So what do you think. I think they are both great!
She called a few days later and my husband answered the phone. He told her I made the comment that "my daughter was trying to outdo her mother". I'm not sure that is what I said, however, she laughed and said "all crafters copy each other"!! That is probably very true in some instances. I need to take a picture of another card she sent me, probably part of the 40 or so cards she and her friend made. I'll post that one later. My card is for sale at $4.00.
 I looked at it and thought I could do something like that too. When I emailed her to thank her and compliment her on her card, she told me the designer paper was from Basic Grey. So I went through my stuff and decided on the design on the right. The designer paper on my card is also from Basic Grey. The stamp used in the square is from a SU set. I forgot to ask her how she did the flourish on her card. Unfortunately, I don't have anything like that. The colors in my card are greens, blues, rust and a dark red. I put a bronze charm in the right hand corner that says "Inspire". The colors in her card are blacks, orange and some gray. The black brads that she used look like they have some glitter in them. We both used a black card base.. So what do you think. I think they are both great!
She called a few days later and my husband answered the phone. He told her I made the comment that "my daughter was trying to outdo her mother". I'm not sure that is what I said, however, she laughed and said "all crafters copy each other"!! That is probably very true in some instances. I need to take a picture of another card she sent me, probably part of the 40 or so cards she and her friend made. I'll post that one later. My card is for sale at $4.00.
Thursday, November 20, 2008
Holiday Gift Fair, Part II
Here is Part II of the Holiday Gift Fair....
Cards:
These cards are available for $4.00 each. If purchasing 2 or more cards, they are $3.50 each.
 This card can be used as a birthday card or any other occasion that is being celebrated. The card base is teal with a black layer and then a Kraft layer that I used my Cuttlebug on. I embossed an inch or so on the top and bottom and left an open space where the "Celebrate" is stamped. I turned the layer over and on my cutter scored two narrow lines where the embossing ended on both the top and bottom. I finished it off with a stitched turquoise ribbon from A Muse.
 These are 2 Asian cards that I made some time ago. The one on the left is a red card base. The three squares are layered with black, red and white. The white layer was stamped with three different Kanji stamps. There is a black strip on the right of the card that I put a sheer gold ribbon over. The card on the right has a black card base with a gray layer that I stamped a Japanese writing stamp on in black ink. The butterfly was first stamped on the gray layer then stamped again on a piece of Washi paper and cut out. I backed the Washi with a piece of heavier paper to give it some body. It was then placed over the stamped butterfly with foam tape. A small section of the Japanese writing stamp was stamped with white ink onto the black strip and a small scalloped circle with a sentiment was placed over the strip using foam tape. I first made this particular card in an Asian card class at The Paper Garden.
 Two more Asian cards. The card on the left has a light green card base. (I apologize again for my poor picture taking, it's hard to see what's on the card. And too, the cards are in clear protective sleeves. I should have taken them out.) The stamps used are from a Kodomo clear stamp set using their watercolor stamp pads. One of the stamps was used on the green layer. Then there is a narrow gold and red layer that has a chop stamp on the bottom of the red layer. Another piece of gold backs the ivory layer that has a pagoda stamped on it again using a Kodomo watercolor stamp pad. These stamp pads have several different colors on each pad. Then a piece of sheer ribbon with an Asian coin is wrapped around the gold and ivory layer. This card was also first made in an Asian card class. The card beside it has an ivory card base that has tiny dots all over it. The squares are black, gold and a piece of Washi paper. I cut out a piece of cardboard and covered it with the Washi so it looks puffy. I adhered a black tassel behind the Washi square. A tiny piece of Washi is placed under the gold layer.
 Both of these are birthday cards. The one on the left has an olive green card base, then a pink layer and then a white layer that I used the Cuttlebug on. I repeated the layers again and stamped a flower on the white layer with Happy Birthday in the bottom corner. I used Copic markers on the flower, two different pinks and two different greens. I tied a sheer pink polka dot ribbon over the larger layers. I also rounded the corners on the layers. A very girly looking card. The card beside it has a light aqua card base. If I remember correctly, the top layer is Groovy Guava by SU that I cuttlebugged. The bottom layer is DP. I then used a black layer and a white layer that I stamped a flower vase from a SU set. I used SU markers to color it. SU's ticket corner punch was used and I rolled the white layer in Groovy Guava ink. The ribbon is AMuse. The oval was rolled through Groovy Guava ink also and used an AMuse birthday stamp.
 This card was made using stamps from Memory Box. I actually CASED the card using a different color scheme than is used on the sample on their website. When I first saw the card at The Paper Garden I just had to have the stamps. I have a "thing" right now for butterflies! :) The card base is purple then an ivory layer. On most of the card samples from Memory Box, an ivory layer is used and then it is sponged with Versamagic Gingerbread ink using a dauber. I need lots of practice doing this technique, however, I sure like the way it looks. Then I used a pink color and tried to daub a rectangle where I wanted the first stamp to go. I actually measured out the area and I think it came out ok. I stamped the word stamp that includes the butterfly first in black ink over the rectangle. Then I stamped it again on a scrap piece of white, colored in the butterfly using 2 different purples then cut it out. I mounted it over the stamped butterfly with foam tape. The second stamp is the two small butterflies and flowered branch. I colored in the flowers with a dark pink. I absolutely love this card and think it came out as good as the Memory Box website sample. :)
 This Christmas card has a red card base. The black layer was cuttlebugged. The smaller red layer is Stardream red so it has some shimmer to it. I have had this candle stamp for some time and forgot I even had it. It's amazing what you find when you go looking through your stash. I used Copic markers to color it in then went all over it with a clear Spica glitter pen. I think I ruined it by doing that. It's hard to see that the candle is red. I used red crystals for the holly berries then tied white sheer ribbon at the bottom.
 The stamp used on this Christmas card is from a SU set. The card base is Christmas red with black and white layers. I used Copic markers to color, then again used a clear Spica glitter pen. I used gold Stickles on the streamers, around the edge of the square and the middle of the poinsettia.
 The stamp used here is from the same set as the previous card. The berries were colored in with red Stickles and gold Stickles used around the edge of the square and the streamers. The card base is a Christmas green with black and white layers. The sentiment is from the same set.
 The next two Christmas cards are also from Memory Box. The card base on this one is burgundy with the ivory layer. I used the same technique as the butterfly card, daubing it with Versamagic Gingerbread ink. The word block was stamped in brown. I also stamped the reindeer in brown and then colored it with Copic Light Walnut marker. I used a red crystal for its nose.
 On this card, the card base is a dark brown with an ivory layer. I stamped the tree with Versamark then embossed it with gold embossing powder. The same reindeer was used and colored with Copic Light Walnut marker. I colored in the nose with a Copic Strong Red marker. Both of these cards are very classic looking.
Journals: These can be used for many different purposes. They are made using the black and white composition books that we used in school. I made one of these for myself some time ago that I am using to write the directions for the cards I make. Mine did not turn out as well as these did. I found a tutorial online that was so easy to use. They are completely covered front and back, and inside too. I included a ribbon to be used as a page marker. I am selling them for $8.00 and can be made in different color choices.
 This one is yellow, green and turquoise stripes. The piece covering the binding is green with white circles. The inside is covered with yellow and the ribbon is green edged in yellow.
 This one is two different turquoise patterns. A piece of lavender card stock was adhered to the edge of the two pieces. I wanted to use ribbon there, however, it was after I had already adhered the inside layer and didn't want any raw edges to be shown. Any future ones I make will have ribbon to cover the two seams. The inside is lined with turquoise. The page marker is striped lavender and turquoise ribbon.
 This was my favorite and was the only one I sold. I may have more of this paper left that I could possibly make another one. The pattern repeats on the back. It has an ivory background with black dots then the pattern is coral. The piece on the binding is the coral with white dots. The inside is lined with beige and has an ivory page marker.
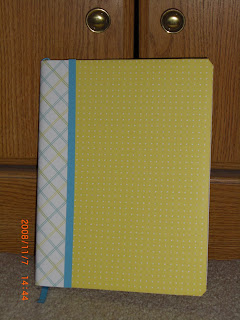 This one is yellow with white dots and the binding is the same stripped cardstock used on the first journal. A strip of turquoise is placed where the two pieces join and the page marker is turquoise ribbon. The inside is lined with yellow.
 This last one is covered with mauve that has tiny white squares on it. The binding is beige with mauve and orange flowers and sage green. There is a strip of sage green over the two pieces and the page marker is sage green. The inside was covered with mauve.
Shopping List Notebooks: I am selling these for $3.00. If two or more are purchased, they are $2.75 each. They can also be made in different choices.
 Unfortunately this one is sold. It is purple with a patterned purple designer paper panel on the front and inside the front cover. It's tied with a lavender ribbon. I may be able to make another one that is similar. The designer paper may be different.
 This is also sold. It has a black cover with designer paper in ivory with a black pattern. Black ribbon ties it shut.
 This one is also sold. It has a lavender base with a striped designer paper in pinks, greens, lavender and turquoise. The ribbon is sheer polka dot lavender. I think I still have some of this paper left.
 This one is available. It has a burgundy base and the designer paper is a grayish blue with burgundy, white, olive green and yellow circles and dots. It's tied with a light brown ribbon.
 This is another sold one. The base is a sage green. The designer paper is ivory background with different shades of pink roses and sage green leaves. I think I have more of this paper too. I used a dark pink ribbon to close it with. This one is my favorite.

 I didn't realize I uploaded these two same ones. At any rate, the first one is red with a beige color designer paper. It has a musical score on it. The butterfly was colored using different fall colors, browns and gold and tied with a red ribbon. The next one has a blue cover. The striped paper has blues, yellow, and a dark pink in it. The birds were colored in blue. The next one is a hot pink. The designer paper has pink, green and a lighter pink circles. The last one I believe was explained above.
 Here is one of them opened up. This picture is so bad, its hard to tell.
Bookmarks: These were made from pieces of cardstock that were left over after making the Baby Shower Invitations that I posted in an older post. Ivory cardstock was used for the stamp and sentiment and then backed with a piece of colored cardstock. The corners were rounded. Then they were laminated, holes punched in them at the top, the corners rounded and then coordinating ribbon tied through the hole at the top. This project was a me, husband and friend Michelle project. Michelle stamped and backed the majority of them. I then borrowed her laminating machine after she found the pouches online and I ordered them so that my husband could laminate all of them. There were 89 total. He helped reluctantly; they would not have been finished if he had not helped me. I thanked him for his efforts and hope he realizes how much I appreciated his help. I then rounded the corners and he punched the holes in the top so I could tie the ribbons. I even snuck a few with me when we went on our trip to PG so I could tie ribbons. There are several of most of the designs in different color combinations. I am selling them for $2.00 or 2 or more for $1.75.
 A dark green tree backed with dark green, a gray watering can with flowers backed in a bright pink and madonna and child stamped in blue and backed with blue.
 Christmas dove backed with turquoise, puppy in a shoe stamped in brown and backed with brown, wishing well with purple flowers backed with purple, purple flower in vase backed with purple.
 Red Roses backed with red, blue snowflakes backed with blue, Santa and his reindeer backed with red and herb pots backed in dark green. Because these designs go sideways, I did not put ribbons on them.
 Bird on a tree stump, another wishing well, teddy bear in stocking and a trio of trees.

 I goofed again. I don't know how to delete a picture. Need to find out how to do that. If anyone knows, holler ok!! Violets done in purple, a daffodil done in purple, flowers done in hot pink and a branch of cherry blossoms done in dark pink.
Cards:
These cards are available for $4.00 each. If purchasing 2 or more cards, they are $3.50 each.
 This card can be used as a birthday card or any other occasion that is being celebrated. The card base is teal with a black layer and then a Kraft layer that I used my Cuttlebug on. I embossed an inch or so on the top and bottom and left an open space where the "Celebrate" is stamped. I turned the layer over and on my cutter scored two narrow lines where the embossing ended on both the top and bottom. I finished it off with a stitched turquoise ribbon from A Muse.
 These are 2 Asian cards that I made some time ago. The one on the left is a red card base. The three squares are layered with black, red and white. The white layer was stamped with three different Kanji stamps. There is a black strip on the right of the card that I put a sheer gold ribbon over. The card on the right has a black card base with a gray layer that I stamped a Japanese writing stamp on in black ink. The butterfly was first stamped on the gray layer then stamped again on a piece of Washi paper and cut out. I backed the Washi with a piece of heavier paper to give it some body. It was then placed over the stamped butterfly with foam tape. A small section of the Japanese writing stamp was stamped with white ink onto the black strip and a small scalloped circle with a sentiment was placed over the strip using foam tape. I first made this particular card in an Asian card class at The Paper Garden.
 Two more Asian cards. The card on the left has a light green card base. (I apologize again for my poor picture taking, it's hard to see what's on the card. And too, the cards are in clear protective sleeves. I should have taken them out.) The stamps used are from a Kodomo clear stamp set using their watercolor stamp pads. One of the stamps was used on the green layer. Then there is a narrow gold and red layer that has a chop stamp on the bottom of the red layer. Another piece of gold backs the ivory layer that has a pagoda stamped on it again using a Kodomo watercolor stamp pad. These stamp pads have several different colors on each pad. Then a piece of sheer ribbon with an Asian coin is wrapped around the gold and ivory layer. This card was also first made in an Asian card class. The card beside it has an ivory card base that has tiny dots all over it. The squares are black, gold and a piece of Washi paper. I cut out a piece of cardboard and covered it with the Washi so it looks puffy. I adhered a black tassel behind the Washi square. A tiny piece of Washi is placed under the gold layer.
 Both of these are birthday cards. The one on the left has an olive green card base, then a pink layer and then a white layer that I used the Cuttlebug on. I repeated the layers again and stamped a flower on the white layer with Happy Birthday in the bottom corner. I used Copic markers on the flower, two different pinks and two different greens. I tied a sheer pink polka dot ribbon over the larger layers. I also rounded the corners on the layers. A very girly looking card. The card beside it has a light aqua card base. If I remember correctly, the top layer is Groovy Guava by SU that I cuttlebugged. The bottom layer is DP. I then used a black layer and a white layer that I stamped a flower vase from a SU set. I used SU markers to color it. SU's ticket corner punch was used and I rolled the white layer in Groovy Guava ink. The ribbon is AMuse. The oval was rolled through Groovy Guava ink also and used an AMuse birthday stamp.
  This card was made using stamps from Memory Box. I actually CASED the card using a different color scheme than is used on the sample on their website. When I first saw the card at The Paper Garden I just had to have the stamps. I have a "thing" right now for butterflies! :) The card base is purple then an ivory layer. On most of the card samples from Memory Box, an ivory layer is used and then it is sponged with Versamagic Gingerbread ink using a dauber. I need lots of practice doing this technique, however, I sure like the way it looks. Then I used a pink color and tried to daub a rectangle where I wanted the first stamp to go. I actually measured out the area and I think it came out ok. I stamped the word stamp that includes the butterfly first in black ink over the rectangle. Then I stamped it again on a scrap piece of white, colored in the butterfly using 2 different purples then cut it out. I mounted it over the stamped butterfly with foam tape. The second stamp is the two small butterflies and flowered branch. I colored in the flowers with a dark pink. I absolutely love this card and think it came out as good as the Memory Box website sample. :)
 This Christmas card has a red card base. The black layer was cuttlebugged. The smaller red layer is Stardream red so it has some shimmer to it. I have had this candle stamp for some time and forgot I even had it. It's amazing what you find when you go looking through your stash. I used Copic markers to color it in then went all over it with a clear Spica glitter pen. I think I ruined it by doing that. It's hard to see that the candle is red. I used red crystals for the holly berries then tied white sheer ribbon at the bottom.
 The stamp used on this Christmas card is from a SU set. The card base is Christmas red with black and white layers. I used Copic markers to color, then again used a clear Spica glitter pen. I used gold Stickles on the streamers, around the edge of the square and the middle of the poinsettia.
 The stamp used here is from the same set as the previous card. The berries were colored in with red Stickles and gold Stickles used around the edge of the square and the streamers. The card base is a Christmas green with black and white layers. The sentiment is from the same set.
 The next two Christmas cards are also from Memory Box. The card base on this one is burgundy with the ivory layer. I used the same technique as the butterfly card, daubing it with Versamagic Gingerbread ink. The word block was stamped in brown. I also stamped the reindeer in brown and then colored it with Copic Light Walnut marker. I used a red crystal for its nose.
 On this card, the card base is a dark brown with an ivory layer. I stamped the tree with Versamark then embossed it with gold embossing powder. The same reindeer was used and colored with Copic Light Walnut marker. I colored in the nose with a Copic Strong Red marker. Both of these cards are very classic looking.
 The other cards that I have available can be found in older posts here on my blog. I didn't want to repeat posting them.
Journals: These can be used for many different purposes. They are made using the black and white composition books that we used in school. I made one of these for myself some time ago that I am using to write the directions for the cards I make. Mine did not turn out as well as these did. I found a tutorial online that was so easy to use. They are completely covered front and back, and inside too. I included a ribbon to be used as a page marker. I am selling them for $8.00 and can be made in different color choices.
 This one is yellow, green and turquoise stripes. The piece covering the binding is green with white circles. The inside is covered with yellow and the ribbon is green edged in yellow.
 This one is two different turquoise patterns. A piece of lavender card stock was adhered to the edge of the two pieces. I wanted to use ribbon there, however, it was after I had already adhered the inside layer and didn't want any raw edges to be shown. Any future ones I make will have ribbon to cover the two seams. The inside is lined with turquoise. The page marker is striped lavender and turquoise ribbon.
 This was my favorite and was the only one I sold. I may have more of this paper left that I could possibly make another one. The pattern repeats on the back. It has an ivory background with black dots then the pattern is coral. The piece on the binding is the coral with white dots. The inside is lined with beige and has an ivory page marker.
 This one is yellow with white dots and the binding is the same stripped cardstock used on the first journal. A strip of turquoise is placed where the two pieces join and the page marker is turquoise ribbon. The inside is lined with yellow.
 This last one is covered with mauve that has tiny white squares on it. The binding is beige with mauve and orange flowers and sage green. There is a strip of sage green over the two pieces and the page marker is sage green. The inside was covered with mauve.
Shopping List Notebooks: I am selling these for $3.00. If two or more are purchased, they are $2.75 each. They can also be made in different choices.
 Unfortunately this one is sold. It is purple with a patterned purple designer paper panel on the front and inside the front cover. It's tied with a lavender ribbon. I may be able to make another one that is similar. The designer paper may be different.
 This is also sold. It has a black cover with designer paper in ivory with a black pattern. Black ribbon ties it shut.
 This one is also sold. It has a lavender base with a striped designer paper in pinks, greens, lavender and turquoise. The ribbon is sheer polka dot lavender. I think I still have some of this paper left.
 This one is available. It has a burgundy base and the designer paper is a grayish blue with burgundy, white, olive green and yellow circles and dots. It's tied with a light brown ribbon.
 This is another sold one. The base is a sage green. The designer paper is ivory background with different shades of pink roses and sage green leaves. I think I have more of this paper too. I used a dark pink ribbon to close it with. This one is my favorite.
 I didn't realize I uploaded these two same ones. At any rate, the first one is red with a beige color designer paper. It has a musical score on it. The butterfly was colored using different fall colors, browns and gold and tied with a red ribbon. The next one has a blue cover. The striped paper has blues, yellow, and a dark pink in it. The birds were colored in blue. The next one is a hot pink. The designer paper has pink, green and a lighter pink circles. The last one I believe was explained above.
 Here is one of them opened up. This picture is so bad, its hard to tell.
Bookmarks: These were made from pieces of cardstock that were left over after making the Baby Shower Invitations that I posted in an older post. Ivory cardstock was used for the stamp and sentiment and then backed with a piece of colored cardstock. The corners were rounded. Then they were laminated, holes punched in them at the top, the corners rounded and then coordinating ribbon tied through the hole at the top. This project was a me, husband and friend Michelle project. Michelle stamped and backed the majority of them. I then borrowed her laminating machine after she found the pouches online and I ordered them so that my husband could laminate all of them. There were 89 total. He helped reluctantly; they would not have been finished if he had not helped me. I thanked him for his efforts and hope he realizes how much I appreciated his help. I then rounded the corners and he punched the holes in the top so I could tie the ribbons. I even snuck a few with me when we went on our trip to PG so I could tie ribbons. There are several of most of the designs in different color combinations. I am selling them for $2.00 or 2 or more for $1.75.
 A dark green tree backed with dark green, a gray watering can with flowers backed in a bright pink and madonna and child stamped in blue and backed with blue.
 Christmas dove backed with turquoise, puppy in a shoe stamped in brown and backed with brown, wishing well with purple flowers backed with purple, purple flower in vase backed with purple.
 Red Roses backed with red, blue snowflakes backed with blue, Santa and his reindeer backed with red and herb pots backed in dark green. Because these designs go sideways, I did not put ribbons on them.
 Bird on a tree stump, another wishing well, teddy bear in stocking and a trio of trees.
 I goofed again. I don't know how to delete a picture. Need to find out how to do that. If anyone knows, holler ok!! Violets done in purple, a daffodil done in purple, flowers done in hot pink and a branch of cherry blossoms done in dark pink.
Holiday Gift Fair
 On Saturday, November 8th, the Women's Ministries at our church sponsored a Holiday Gift Fair. There were over 20 vendors at the fair, ie, Cookie Lee Jewelry, Tupperware, Party Lite Candles, Mary Kay, Pampered Chef, Longaberger Baskets, Home Interiors, Home & Garden and others I can't think of now. My booth was one of about 3 vendors that offered handcrafted items. A few of the vendors did quite well, some did nothing at all. I, at least, paid for my booth space with a little extra. We had a pretty good crowd considering that it was a windy, cold day. All in all, it was quite a learning experience.
I've committed to doing another boutique on December 11th at the Charter School where three of our granddaughters have gone for extra credit classes. I need to get busy and do more Christmas items. I worked my fingers to the bone after we returned from our trip to Pacific Grove getting things ready for this fair. I am hoping this one will do a little better.
 Here's some of the items I had for sale. I need to do something different in showcasing my cards, etc. They were just laying on the table. There were cards, bookmarks, shopping list pads and journals. I will do another post showing the items that I am offering for sale through my blog.
Anniversary Trip to Pacific Grove/Monterey
 You will see the pictures first then have to scroll down to read my post of our trip. I wanted my pictures at the end. Oh well!! Next to the Lodge where we stayed is a cemetery. In the evening the coastal deer come out to feed. Here's the buck walking towards where the does were feeding. He wasn't very big. As we were leaving he came up pretty close to where we were parked.
 Here's few of the does feeding. They do not seem to be bothered by people being close by watching them.
 Sunday afternoon we parked along Ocean View Drive and watched the waves. Probably because of the rainy weather, the waves were pretty high. I miss so much being close to the water. I am always quite content when we do take a trip to this area and I can just sit and watch the water.
 We were told by a docent at the Aquarium that this bird has been with the Aquarium since it opened, some 20 years ago. It has some arthritis in it's one leg so limps quite a bit.
 The penguins being fed. They are so fun to watch. The water spots on the glass are from them splashing in the water.
 One of the many huge fish in the Kelp Forest. I took lots of pictures at the Aquarium, unfortunately, very few actually came out good.
 We visited the Butterfly Grove on Saturday. It's just around the corner from the Lodge where we stayed. Those dark spots on the leaves are the butterflies clinging to the leaves, hundreds and hundreds of them. At first it looked like dead leaves until they fluttered their wings.
 The dark spots on the rocks are hundreds of black birds. This was a block or two from the Lodge along Ocean View Drive.
 The dark spots in the water are otters floating along, some on the kelp. We missed seeing the otters being fed at the Aquarium.
On Friday, October 31st we left Sacramento bright and early for a trip to Pacific Grove/Monterey to celebrate our 28th anniversary, which was Saturday November 1st. We stayed at the Lighthouse Lodge & Suites. My husband's bike club stays here when they go over to Pacific Grove for their annual bike ride every year in October. We were there about 3 years ago on the club's ride. And in fact, the weekend before the club was there for their ride. Anyway, the room we had this time was not the greatest. It was pretty small, the king size bed took up most of the space. We were there from Friday until Monday the 3rd and each day we had to go to the office to ask for hand towels and/or washcloths.
We stopped in Castroville at The Giant Artichoke Restaurant for breakfast. Years ago when I lived in Salinas, this was a little vegetable stand. They served deep fried artichokes, which they still do, and I use to drive from Salinas to Castroville during lunch to get these fried artichokes for everybody in the office. It was driving on country roads, I could make it up there and back in 45 minutes. There would still be time to eat them when I got back to the office.
The Lodge offers a full breakfast for the guests of the Lodge and Suites each morning. The Suites are across the street from the Lodge. There's scrambled eggs, fried potatoes, sausage or bacon, danish, bread for toast, dry cereal, oatmeal one morning and assorted fruits, fruit juices and milk. Lots of hot coffee too. We ate breakfast there 2 of the mornings. Of course, it was before the election and the TV was on CNN. My husband can't stand CNN so we hurriedly ate so we didn't have to listen to what was being said. In the evenings they also offer a BBQ for the guests. I think when the weather is bad they do something else for dinner. It's usually hamburgers, hotdogs, potato or macaroni salad and something for dessert. We ate there Friday night.
On Saturday we visited the Monarch Butterfly Grove which is not too far from the Lodge. It was hard at first to see them, they were the dark spots clinging to the leaves of the eucalyptus trees, then drove through the town of Carmel and down to the Courtyard, an outside shopping mall off of Highway 1 on Carmel Valley Road. We did a little shopping there then drove up Carmel Valley Road to the village. I have a friend who use to work for San Saba Wineries and the last I knew their tasting room was up in the village. Well, we couldn't find it so we drove back down to Highway 1 and stopped at The Barnyard. It's another shopping place across from The Courtyard. Got a piece of some delicious chocolate at a shop there.
We looked through some of the brochures we had of the Monterey area and found out where the tasting room was for the San Saba Winery so decided to drive down there. It's in Soledad which is south of Salinas. It was a beautiful drive, had some rain along the way. We found the tasting room and then sadly found out that my friend no longer worked for San Saba. We were told where we could find her.
It was back to the Lodge for a little bit then went to the Fisherman's Wharf in Monterey for dinner at our favorite restaurant on the wharf, Rappa's. It's at the very end of the wharf. We go there everytime we are in Monterey. The fish is always so fresh and we try to get a window table so we can watch what's going on with the boats. We noticed this time that the seals weren't climbing all over the boats as they have in the past. Our waiter told us its because there is hardly any fish in the wharf area so the seals don't come. We did hear some barking but couldn't see where they were.
As we left, it started to sprinkle a little. We had had rain off and on since we got there on Friday. Thankfully, we had our umbrella with us. We also noticed that there were hardly any people on the wharf. It could have been because of the weather and/or the economy.
On Sunday we went to the Aquarium and spent a couple of hours there. We could have stayed longer, however the parking space my husband found was only for 2 hours. Our tickets were also good for 2 days and we thought about going back down on Monday before we left town. After we left the Aquarium we decided to drive back to Carmel Village and see if we could find Janie which we did. She manages the tasting room for Cima Collina Winery. It was so good to see her.
Back in the mid 70's I lived in Salinas for about 10 months. It's a long story as to how I got there, however Janie and I worked for Salinas Valley Radio which offered radio/phone service to the growers in the fields surrounding the Salinas area. We became very close friends. We were both single moms and so spent a lot of time together outside of work. Her son is 5 years older than my daughter and at one time, lived in Sacramento. In 2005 when we went over to Pacific Grove for my husband's bike club ride, I looked up Janie and we met for breakfast. A couple of years ago my Christmas card that I sent her came back and I thought she had finally left the Salinas area. Anyway, I'm glad to have hooked up with her again. Hopefully, we will do better with keeping in touch.
Sunday night we had dinner at a Korean restaurant in Monterey that we went to back in 2005. There was just another couple there besides us. We spent some time visiting with the owner and her husband. The food is really good. I can't think of the name of the restaurant, it's on Lighthouse Avenue in Monterey before you get to David Street which you take to get to Pacific Grove Lighthouse Avenue. Try it if you are ever in the area and like Korean food.
We left the Lodge on Monday morning to head back to Sacramento. I didn't want to eat at the Lodge again so we stopped at Toastie's on Lighthouse Avenue in Pacific Grove. I wanted to go to the Red House but it's not open for breakfast during the week. Anyway I had been to Toastie's with Janie and knew the food was good. I had blueberry pancakes which were yummy, could only eat one and a half of them. My husband had a fried potato scramble and he couldn't finish his either. It was lots of food. It was a very busy place too.
On the way home we stopped in San Juan Bautista at the San Juan Bakery to get some of their delicious bread. Got a loaf of their Portuguese Sweet Bread, Coconut White Chocolate Bread, Portuguese Orange Bread and some Peanut Butter cookies. The sweet bread is absolutely yummy. My husband made french toast with it one morning. The Coconut White Chocolate Bread was out of this world good. It's their newest bread. Very rich!! The Portuguese Orange Bread was ok, nothing to shout about. The bakery has been there in town for many years!!! Leaving there we drove back to Highway 101 then took 152 over to I5 and stopped at Casa de Fruita for a few minutes. There's a new highway going through there now so there's an off ramp for the place. It use to sit right on the highway. Lots of stuff going on there but hardly any people. We were home by 2:30 that afternoon.
It was a great trip celebrating our anniversary and spending time together without any distractions.
Subscribe to:
Posts (Atom)


