I hope Christmas was a wonderful day. It was very quiet and relaxing here. Slept in this morning. After reading my email, I fixed breakfast. Christmas morning is the only day of the year that I plan to fix breakfast. I usually have a muffin and some orange juice for my breakfast. Gerry will fix himself pancakes or eggs and sausage sometimes. Usually its a bowl of cereal for him every morning. I found a recipe online for a bacon, eggs, tomatoes and cheese casserole. It was easy to put together, however, took longer than the stated 35 minutes to bake. It was ok, nothing very exciting.
Dinner on the other hand was very good. I fixed a top sirloin beef roast with some red potatoes. It was so good, tender and could cut it with a fork. I preheated the oven to 425, smoothered the roast with sea salt and a combination of garlic and black pepper. I think it's made by McCormick's. I use it on everything. Anyway, I then roasted it for an hour, shut off the oven and let it sit in there for about 30 minutes while the fresh asparagus steamed. I took the roast out and let it sit for a few minutes before Gerry sliced it. It was a perfect medium rare, just like we like it. The roast was about 3 and a half pounds, so there are leftovers for sandwiches tomorrow. With the potatoes, I cut them in half, salt and peppered them with the garlic/pepper mixture then sprinkled olive oil all over and placed them around the roast. They were kind of crispy on the outside and nice and soft in the middle. My blog friend, Jalna, always takes pictures of the meals that are fixed in her home. Unfortunately, I didn't think ahead and do the same thing. Just take my word for it, it was absolutely ONO which is Hawaiian for YUMMY!!
After I got the kitchen cleaned up, we bundled up and went for a ride to see Christmas lights. First we drove over to Orangevale to Dove Court. All the homes on this court have been decorating their homes for years. I don't remember when it first started, my daughter was in high school when we first visited. You can either drive through or park and walk through. We have done both. Tonight we parked in the parking lot of a church across the street from the court and then walked over. The traffic is always very heavy and lots of people walking through. Even with the economy like it is, the homes were beautifully decorated. We then drove over to Folsom and Granite Bay to look at more lights. We drove through one area in Folsom that overlooks Folsom Lake. The bike club Gerry belongs to rides through there. There was one home that was absolutely huge. There were lights completely surrounding the roof line of the home and all kinds of cut out figures and lights covering the entire yard. It was just breathtaking with all the lights.
We then drove over to Rocklin in Placer County. There is a street there that goes all out with decorated homes. We parked and walked the entire street. It is quite long and goes around in a circle. I couldn't believe I actually walked the whole thing. The last part of it I was fading fast. I have some back issues that make it very difficult to walk long distances. Some homes had animated things and music coordinated with lights. Of course, I didn't think to take a camera.
Oh, I asked for a Bind-It-All by Zutter with some accessories for Christmas. Gerry bought me the V.2 of the machine with the carrying case and a corner rounder punch made by the same company. This machine is used to make altered books with the spiral binding. I've wanted one since they first came out. So now I need to get some of the wire combs and some clipboard and play with it.
I have some projects to post and will try to do that tomorrow.
Thursday, December 25, 2008
Saturday, December 20, 2008
Blog Candy on Chris Dickinson's Blog
Just a quick post. Chris Dickinson is on the design team for Sweet and Sassy Stamps. I periodically check her blog out. She has some fun blog candy posted. Here's the link for her blog: http://chrissyd723.blogspot.com.
Sunday, December 14, 2008
Bead Jewelry/Cards Workshop
Yesterday, Saturday 12/13 I did a workshop at Amy Comi's home in Lincoln, she is a friend from church, with Mary Dillon who makes and sells bead jewelry. Mary was a vendor at our church's holiday gift fair in November. She and Amy are friends. Amy provided beads and Mary brought the supplies. Each guest invited could make a pair of earrings for $5 or a bracelet for $7. I had 2 card samples and a small card to put the earrings on. The cost to make a card and small card for the earrings was $5. There was a small charge if anyone wanted to make a second card. We had 8 guests. Four people made a card, 3 of them made a second card. The others made earrings or a bracelet. Amy had told me she had some beads she had gotten on a trip to Hawaii. After everyone left, I chose these beads to make a bracelet. They are little koa beads that I  used along with some silver spaces and topaz colored crystals. The closure is a magnetic silver flower. We all thought it looked like a hibiscus, the state flower of Hawaii. I was so proud of myself, I actually made this. Mary helped me finish it off. I wore it last night to a concert we had at church and then again this morning to church. Sure do love it and it's easy to put on with the magnetic closure. Of course, it comes off easily too, it happened twice at church this morning. The two cards that were offered to be made are these that were made in the card class held here at the mobile home park in October. They are the Dove and small Christmas tree. Go here to see them again http://elegantreflections.blogspot.com/2008/10/card-class-and-craft-fair.html. Everyone had a great time and we are going to plan to do another workshop in the spring time.
Mary and I had items for sale. I actually did quite well in that regard. I sold 12 of the shopping list notepads I made this past week along with the last 4 of the smaller version I made for our holiday craft fair. Also sold several cards. I am not sure if Mary sold any of her pieces.
 used along with some silver spaces and topaz colored crystals. The closure is a magnetic silver flower. We all thought it looked like a hibiscus, the state flower of Hawaii. I was so proud of myself, I actually made this. Mary helped me finish it off. I wore it last night to a concert we had at church and then again this morning to church. Sure do love it and it's easy to put on with the magnetic closure. Of course, it comes off easily too, it happened twice at church this morning. The two cards that were offered to be made are these that were made in the card class held here at the mobile home park in October. They are the Dove and small Christmas tree. Go here to see them again http://elegantreflections.blogspot.com/2008/10/card-class-and-craft-fair.html. Everyone had a great time and we are going to plan to do another workshop in the spring time.
Mary and I had items for sale. I actually did quite well in that regard. I sold 12 of the shopping list notepads I made this past week along with the last 4 of the smaller version I made for our holiday craft fair. Also sold several cards. I am not sure if Mary sold any of her pieces.
More State of Hawaii Flag Pictures
Here's 4 more pictures of the Hawaii State flag taken just a few minutes ago. It is a gloomy, cold day here in Sacramento. There is some wind so the flags are unfurled a little better than they were with the ones I posted earlier.
 See the gray sky and clouds. It was raining when we woke up this morning. It may have rained all through the night, I don't think very hard. It is very cold. We came in from church and lunch about a half hour ago and I just took my jacket off. The heater is slowly but surely heating the mobile up. The window on the right is my craft room/office where I spent a lot of time.
 Another view of the flags.
 They are really standing out in this picture. Just wish it was a sunny day instead of a wintery day.
 It is a gloomy, cold day here in Sacramento. There is some wind so the flags are unfurled a little better than they were with the ones I posted earlier.
 See the gray sky and clouds. It was raining when we woke up this morning. It may have rained all through the night, I don't think very hard. It is very cold. We came in from church and lunch about a half hour ago and I just took my jacket off. The heater is slowly but surely heating the mobile up. The window on the right is my craft room/office where I spent a lot of time.
 Another view of the flags.
 They are really standing out in this picture. Just wish it was a sunny day instead of a wintery day.
 Friday, December 12, 2008
Three New Christmas Cards
I made these Christmas cards today. The stamp images are all from Memory Box. This first card has a burgundy card base. The layer of designer paper is from one of Memory Box's Christmas packs. Dave Brethauer, the owner and designer of Memory Box does a lot of daubing the light color cardstock that he uses for his cards. I did that with all 3 of these cards that I made. After I stamped the Dove collage and daubed the ivory layer, I mounted it on a black layer. I colored the leaves of the sprig with a dark green Copic marker and put glitter on the dove. The sentiment I used is from a clear AMuse stamp set. I also put a layer of ivory paper on the inside with a strip of the designer paper. I really like the way this turned out. This card has a dark brown card base. The next layer is Summer Sun from SU. On the ivory layer, I daubed it as I did on the card above using Versamagic Gingerbread ink. I do believe this is Dave's favorite color ink to use when daubing on a card. :) I used the Memory Box Sprinkles stamp, which are 2 different size snowflakes mounted on the same wood block, and gold ink and stamped randomly all over the ivory layer.
 The reindeer is also a Memory Box stamp that I stamped in a dark brown and colored with a Copic Light Walnut marker. This, also, is one of Dave's favorite color markers to use. The sentiment is a clear stamp from AMuse and it was stamped in a dark brown. The reindeer has a red nose. There's a layer of ivory cardstock on the inside of the card.
 The card on the left is one that I made at a Make 'n Take in October when Dave visited The Paper Garden. The card base is a light blue 4 1/4 square. It opens on the side. The card on the right is the one I made today. There is a dark brown layer over the card base. I didn't have the same color for the upper layer so used ivory cardstock. I daubed some of the Gingerbread ink on the edgles. The Sprinkles were stamped with Brillance Pearlescent Ice Blue ink. The reindeers were stamped in dark brown and then colored with the Copic Light Walnut marker. I used red Stickles (glitter glue) for their noses. The designer paper used for the bottom strip is from the same paper pack as the first card. I daubed the edges of that piece too. The sentiment I used is a clear stamp from AMuse. I don't have the dark brown ribbon used on the Make 'n Take card so used the sheer brown ribbon from AMuse.
 This card has a dark brown card base. The next layer is Summer Sun from SU. On the ivory layer, I daubed it as I did on the card above using Versamagic Gingerbread ink. I do believe this is Dave's favorite color ink to use when daubing on a card. :) I used the Memory Box Sprinkles stamp, which are 2 different size snowflakes mounted on the same wood block, and gold ink and stamped randomly all over the ivory layer.
 The reindeer is also a Memory Box stamp that I stamped in a dark brown and colored with a Copic Light Walnut marker. This, also, is one of Dave's favorite color markers to use. The sentiment is a clear stamp from AMuse and it was stamped in a dark brown. The reindeer has a red nose. There's a layer of ivory cardstock on the inside of the card.
 The card on the left is one that I made at a Make 'n Take in October when Dave visited The Paper Garden. The card base is a light blue 4 1/4 square. It opens on the side. The card on the right is the one I made today. There is a dark brown layer over the card base. I didn't have the same color for the upper layer so used ivory cardstock. I daubed some of the Gingerbread ink on the edgles. The Sprinkles were stamped with Brillance Pearlescent Ice Blue ink. The reindeers were stamped in dark brown and then colored with the Copic Light Walnut marker. I used red Stickles (glitter glue) for their noses. The designer paper used for the bottom strip is from the same paper pack as the first card. I daubed the edges of that piece too. The sentiment I used is a clear stamp from AMuse. I don't have the dark brown ribbon used on the Make 'n Take card so used the sheer brown ribbon from AMuse.
Paper Crafts
On the Friday after Thanksgiving, Michael's had all of their $19.99 paper packs at 40% off. There was also a 25% coupon for entire purchase good for Friday only. I got a pack of Christmas scrapbook paper, a pack of all occasion scrapbook paper and 2 packs of 12x12 cardstock.
Tomorrow I am doing a card/jewelry workshop out in Lincoln. The invitees will have the opportunity to make either a pair of earrings, a bracelet and a card to use as a gift card. I am doing this workshop with 2 other ladies.
I found out that we could bring product to sell which I had not planned on doing. So I wanted to make up some new items to take along with the items I already have on hand. Anyway, I had 2 composition books left from those that I covered and offered for sale at our church's holiday gift fair last month. The colors on this one are a golden yellow and a mauve pink. I used a coordinating paper to cover the insides and the binding. I decided to put a strip of ribbon where the two papers joined and glued the ends down before I covered the inside of the covers. I really like the way it turned out.
 This one is blue with some white flowers and green leaves. The ribbon is called Apple Green from SU. Of the two, I think I like this one the best.
 I found some Christmas note pads at Michael's and made more shopping list notepads. I made 8 of these using the Christmas scrapbook paper I got on sale. I forgot to take pictures of the insides. They are a little wider than those I made for the Holiday Gift Show in November.

 These are so easy to make and go together rather quickly after I figured out the coordinating pieces.
 I made 8 of these using the assortment of papers from one of the other packs I bought. The paper for the Journals are part of this pack. I got a pack of junior size legal pads from Office Depot to make these and had the pads cut down from 5x8 to 3 1/2 x 8.
 All of the patterns and colors are really fantastic.
 My friend Diana's oldest daughter ordered 7 of these shopping list notepads, so she will have a nice variety to choose from.
Tomorrow I am doing a card/jewelry workshop out in Lincoln. The invitees will have the opportunity to make either a pair of earrings, a bracelet and a card to use as a gift card. I am doing this workshop with 2 other ladies.
I found out that we could bring product to sell which I had not planned on doing. So I wanted to make up some new items to take along with the items I already have on hand. Anyway, I had 2 composition books left from those that I covered and offered for sale at our church's holiday gift fair last month.
 The colors on this one are a golden yellow and a mauve pink. I used a coordinating paper to cover the insides and the binding. I decided to put a strip of ribbon where the two papers joined and glued the ends down before I covered the inside of the covers. I really like the way it turned out.
 This one is blue with some white flowers and green leaves. The ribbon is called Apple Green from SU. Of the two, I think I like this one the best.
 I found some Christmas note pads at Michael's and made more shopping list notepads. I made 8 of these using the Christmas scrapbook paper I got on sale. I forgot to take pictures of the insides. They are a little wider than those I made for the Holiday Gift Show in November.
 These are so easy to make and go together rather quickly after I figured out the coordinating pieces.
 I made 8 of these using the assortment of papers from one of the other packs I bought. The paper for the Journals are part of this pack. I got a pack of junior size legal pads from Office Depot to make these and had the pads cut down from 5x8 to 3 1/2 x 8.
 All of the patterns and colors are really fantastic.
 My friend Diana's oldest daughter ordered 7 of these shopping list notepads, so she will have a nice variety to choose from.
State of Hawaii Flag to Celebrate December 7, 1941
On Sunday, December 7th, my husband took down the Marine Corp flag and put the Hawaii State Flag up in honor of the bombing of Pearl Harbor on December 7, 1941. Unfortunately, when we went out to take pictures, the wind was not very cooperative. Here the American flag was wrapped around the pole and the Hawaii flag was extended out a little. Unfortunately, the top of the flag was bunched up so can't see all of it. I went outside Wednesday afternoon and tried to get some better pictures. This was the best I could get. There has been very little wind the past few days. Thankfully the sun was shining when these two pictures were taken.
 We've had lots of gloomy days with heavy fog. I don't think the sun came out at all today. Rain is forecast for tonight.
 I went outside Wednesday afternoon and tried to get some better pictures. This was the best I could get. There has been very little wind the past few days. Thankfully the sun was shining when these two pictures were taken.
 We've had lots of gloomy days with heavy fog. I don't think the sun came out at all today. Rain is forecast for tonight.
I was born 7 and a half months after Pearl Harbor. The stories go that my mom had just found out she was expecting me. My father was working for a construction company that was building naval housing at Pearl Harbor. He was working that particular Sunday and was involved in the rescue efforts going on there. In fact, a sailor that my dad met while working at Pearl Harbor suggested the nickname "Betty" for me. I know, you are probably thinking that "Betty" was my real name. It's not.
Anyway, may we never forget Pearl Harbor and all that happened that dreadful day and the days and months that followed.
Monday, December 8, 2008
Birthday Card for Dawn/Baby Shower Card for Kimberly and Thank You Notes
This is the birthday card that I made for Dawn, a friend of mine from church. Her birthday was yesterday, Sunday, December 7th. She loves purple so the card base is purple with a piece of designer paper that's a little lighter than the card. I added a black layer and then used a SU set on a white layer. Those are 2 lavender flower brads on the left side with a fabric flower in the center. I used a lavender brad in the center of the flower. The saying says "happy bird-day", there's a tiny bird perched on the edge of the wheelbarrow. I used Copic and SU markers to color. I finished off the inside of the card with a layer of white cardstock and a strip of the designer paper, however, forgot to take a picture of the inside. After church we enjoyed lunch at Mimi's in Roseville with Dawn and her son, Shane. The daughter of another of my friends is expecting her first baby in February. She is having a girl and will name it Brooke Lynn. Kim's shower was Saturday afternoon, given by her mother Diana (my friend) and her big sister Laura. The nursery colors are lavender, seafoam green and cream. I made her card in lavender although it looks blue. There's a piece of designer paper on the side and then I embossed tiny feet on a piece of white backed by a soft green.
 This is the inside of the card, I used a piece of ivory cardstock then a strip of the designer paper which I embossed the tiny feet on. I apologize, the pictures aren't very clear.
 Here are the thank you cards I made for Kim. The card base is a glossy white that I used the Swiss Dots Cuttlebug embossing folder on the top of the card. I used the tiny feet again and backed it with either the soft green or lavender. And added the ribbon to finish it off.
  Kim really liked these cards and placed an order for 2 dozen more, 1 dozen of each. She is having another shower at work in January and wants me to make more thank you cards after that shower. She has also asked me to make her birth announcements.
 The daughter of another of my friends is expecting her first baby in February. She is having a girl and will name it Brooke Lynn. Kim's shower was Saturday afternoon, given by her mother Diana (my friend) and her big sister Laura. The nursery colors are lavender, seafoam green and cream. I made her card in lavender although it looks blue. There's a piece of designer paper on the side and then I embossed tiny feet on a piece of white backed by a soft green.
 This is the inside of the card, I used a piece of ivory cardstock then a strip of the designer paper which I embossed the tiny feet on. I apologize, the pictures aren't very clear.
 Here are the thank you cards I made for Kim. The card base is a glossy white that I used the Swiss Dots Cuttlebug embossing folder on the top of the card. I used the tiny feet again and backed it with either the soft green or lavender. And added the ribbon to finish it off.
  Kim really liked these cards and placed an order for 2 dozen more, 1 dozen of each. She is having another shower at work in January and wants me to make more thank you cards after that shower. She has also asked me to make her birth announcements.
Tuesday, December 2, 2008
Birthday Card for Florence
Here is a card that I made for my friend Florence. We use to work in the same building , she in another department. She got transferred and we kept in touch via email. We discovered that we both enjoyed rubber stamping and have taken a couple of classes together at The Paper Garden. She had a birthday a week ago and this is the card I made for her. The card is a dark olive green and I layered a piece of Basic Grey designer paper on top of that. Again I punched out a couple of butterflies from scraps of dp and used pop dots. On the oval I stamped some flowers from a Kodomo stamp set and stamped "happy birthday" over them.
 On one of the blogs I follow, the stamper always finishes the inside of her cards with a layer of cardstock over the base. I like the way it looks so I did that with this card and used a strip of the dp and another butterfly at the bottom. Unfortunately, I wrote in the card before I took the picture. Hopefully what I did is visible enough. Florence loved her card and made a cute thank you card and sent it to me. She's a busy lady so we don't get to see each other much. She works full-time, has a family and on the weekends she works in her family's grocery store. Sometimes she finds time to stamp!
 She had a birthday a week ago and this is the card I made for her. The card is a dark olive green and I layered a piece of Basic Grey designer paper on top of that. Again I punched out a couple of butterflies from scraps of dp and used pop dots. On the oval I stamped some flowers from a Kodomo stamp set and stamped "happy birthday" over them.
  On one of the blogs I follow, the stamper always finishes the inside of her cards with a layer of cardstock over the base. I like the way it looks so I did that with this card and used a strip of the dp and another butterfly at the bottom. Unfortunately, I wrote in the card before I took the picture. Hopefully what I did is visible enough. Florence loved her card and made a cute thank you card and sent it to me. She's a busy lady so we don't get to see each other much. She works full-time, has a family and on the weekends she works in her family's grocery store. Sometimes she finds time to stamp!
Friday, November 21, 2008
New Posts and Comment About My Blog
Over the last 2 days I have posted several new items. This is all that I've been working on for the last few weeks. Hope it makes up for not posting for several weeks.
Some time ago I downloaded a thing on the blog to show me when people visit the blog and where the visit originates. I have been pleasantly surprised to see how many visits there has been since I put this thing on the blog, up to 369 the last time I looked. Mostly I've been surprised as to where the visits are originating, from Europe, Mexico, South America, British Columbia. There's also been a lot from different states besides California, the east coast, the south, etc. Several people have found my blog in searching for my daughter and son-in-law's coffee shop in Enterprise, AL. A lot of them have been in searching for a particular item and my blog has been one of the choices. However, a lot of them have come from blogger.com. I've been really excited in all of this, however, it would be even more exciting if comments were left too. Someone said on their blog that comments put a smile on their face!!
So for anyone reading the posts on the blog, please leave a comment. I would be so grateful if you did. I started the blog to showcase my cards and sell them, however, family events have found their way to the blog too. Which is ok!! So if you are interested in purchasing anything I have on the blog, please do not hesitate to contact me by leaving a comment.
I have one more item to post, will save that for next week. It's a birthday card for a friend whose birthday is on Monday so I don't want her to see it before then. LOL!
Thank you to all of you who have visited my blog! Remember, leave me a comment when you do!! :)
Have a blessed day!!
Asian Card Order
A couple that eats lunch each Tuesday at the Japanese restaurant where I also have lunch on Tuesdays requested that I make some Asian cards for them. They were my first customers when I started selling my cards the first of this year. I made a total of 9 cards and they purchased 7 of them. This first card has a brown card base, then a layer of black. I stamped a square shadow stamp in Memories Soft Sand ink and then stamped the 4 Kanji cubes in Creamy Brown chalk ink. Each of the symbols were outlined with a clear Spica glitter pen. The husband likes this particular card a lot so I have made several of this design for him over the last few months.
 This card has a piece of burgundy card stock as the first layer. Then I cut a piece of Ultra White card stock and mounted it onto the burgundy. The white is the actual card which opens on the right side. The cherry blossom stem was stamped twice in brown ink. I stamped the branch again several times on a piece of scrap white and cut out the flowers and put them over the flowers that I stamped first with a tiny piece of foam tape. I colored the flowers with a Sakura Glaze red pen. When this ink dries, it has a raised effect. I cuttlebugged about 1 inch of the edge of the white and tied a burgundy ribbon at the crease end. The ribbon is two-toned and is covering a mistake I made when I stamped the branch a second time. :) The stamp set is from SU.
 I have made this particular card using a peach and sage green color scheme and is posted in an older post. This card was done in sage green, lavender and plum. I colored the flowers in lavender. The corners were all rounded and the oval with the sentiment was edged in lavender and mounted with foam tape. A very classic card and perfect for a sympathy card.
 The card base of the card on the left is SU Groovy Guava. The layers are gold metallic, a square of Washi paper, another gold metallic layer and then white. I then stamped a Japanese flower on the white square with SU Groovy Guava ink and put some Stardust Stickles in the center of the flower. I actually CASED the design from a card sample at The Paper Garden.
 This first card has a brown card base, then a layer of black. I stamped a square shadow stamp in Memories Soft Sand ink and then stamped the 4 Kanji cubes in Creamy Brown chalk ink. Each of the symbols were outlined with a clear Spica glitter pen. The husband likes this particular card a lot so I have made several of this design for him over the last few months.
 This card has a piece of burgundy card stock as the first layer. Then I cut a piece of Ultra White card stock and mounted it onto the burgundy. The white is the actual card which opens on the right side. The cherry blossom stem was stamped twice in brown ink. I stamped the branch again several times on a piece of scrap white and cut out the flowers and put them over the flowers that I stamped first with a tiny piece of foam tape. I colored the flowers with a Sakura Glaze red pen. When this ink dries, it has a raised effect. I cuttlebugged about 1 inch of the edge of the white and tied a burgundy ribbon at the crease end. The ribbon is two-toned and is covering a mistake I made when I stamped the branch a second time. :) The stamp set is from SU.
 I have made this particular card using a peach and sage green color scheme and is posted in an older post. This card was done in sage green, lavender and plum. I colored the flowers in lavender. The corners were all rounded and the oval with the sentiment was edged in lavender and mounted with foam tape. A very classic card and perfect for a sympathy card.
 The card base of the card on the left is SU Groovy Guava. The layers are gold metallic, a square of Washi paper, another gold metallic layer and then white. I then stamped a Japanese flower on the white square with SU Groovy Guava ink and put some Stardust Stickles in the center of the flower. I actually CASED the design from a card sample at The Paper Garden.
The card next to it was made in an Asian card class at The Paper Garden. The stamp set is from Kodomo. It's a different set than what we used in class sample. The card was cut 4.25 inches by 11 inches and scored at 5.5 inches. I used Stardust Stickles on the Iris and the Kanji stamp. I cut a small slit in the top fold and threaded the ribbon through and then added the small square before tying the ribbon. The inks used are chalk.
 The card on the left was also done in an Asian card class. It's cut a little larger than usual. The three stamps used is part of a Kodoma stamp set. The gold cord was looped through the Asian coin then wrapped around the panel several times and tied in the back. Because the cord was bulky, I used foam tape to adhere the panel to a green card base. I cut a half of an inch from the front side of the card then used the 4th stamp from this set and stamped a border along the bottom edge. To get it straight I actually drew a faint line with a pencil to use as a guide for placement of the stamp. I stamped it in brown as were the three stamps on the colored squares.
  The card on the left has a black card base, a layer of white then a layer of red Stardust which is shimmery. Then a smaller square of black and a square of white. The stamp used is from Hanko. I colored 2 of the flowers with Copic red marker. On the black flowers I used a clear Spica glitter pen to outline the lines in the center of the flowers.
 The card on the left was also done in an Asian card class. It's cut a little larger than usual. The three stamps used is part of a Kodoma stamp set. The gold cord was looped through the Asian coin then wrapped around the panel several times and tied in the back. Because the cord was bulky, I used foam tape to adhere the panel to a green card base. I cut a half of an inch from the front side of the card then used the 4th stamp from this set and stamped a border along the bottom edge. To get it straight I actually drew a faint line with a pencil to use as a guide for placement of the stamp. I stamped it in brown as were the three stamps on the colored squares.
The card next to it has a brown card base. I cut a piece of Washi paper and adhered it on the left edge of the card. It has blues and golds with white cranes. The fans were stamped on white cardstock with Versamark and then embossed with gold embossing powder. I layered it with a piece of gold cardstock. The wife told me the fans were placed wrong, that the fans should be facing up. The card sample I CASED from The Paper Garden had the fans going down sideways. Of course the stamps that were used on that sample were individual fans on a cube. This stamp was one piece from Hanko.
I hestitate making Asian cards when they are requested from someone who is Asian, be it Japanese or Chinese. It's hard to know if something will be offensive to them. That is one of the reasons that most of the Asian cards I've made have been CASED from the samples at The Paper Garden. I try to change them a little so it's not an exact copy. One of the many things I like about this particular store is that there are tons of card samples and the customers are encouraged to bring a camera and take pictures of the samples.
 The card on the left has a black card base, a layer of white then a layer of red Stardust which is shimmery. Then a smaller square of black and a square of white. The stamp used is from Hanko. I colored 2 of the flowers with Copic red marker. On the black flowers I used a clear Spica glitter pen to outline the lines in the center of the flowers.
The next card has a gray card base, a black layer and another gray layer. The purple is a piece of Washi paper that has a design in it. The kimono is a sticker from Hanko. I cut 2 narrow stripes of gold paper and placed them on the side and then a small chop stamp on the bottom right corner that I stamped with black ink.
These cards are all for sale at $4.00 each.
Baby Cards
At our Holiday Gift Fair, my friend Dawn asked me to make 3 or 4 baby cards that she could use with a gift. Dawn's favorite color is purple and she wanted the cards to all be purple. So here are the four designs I came up with. All of the stamps are from SU sets. On the buggy one, there's a layer of designer paper. I am not sure where I found this, I've used it on several designs. There's a silk flower down in the corner with a flower brad in the middle of the flower and then a plain brad. Forgot I even had these. The card next to it has "congratulations" stamped on the four sides of the frame.
 The stamps used on the left are SU and the other one is a animal train stamp from "The Cat's Pajama's". Pretty simple and cute too.
 On the buggy one, there's a layer of designer paper. I am not sure where I found this, I've used it on several designs. There's a silk flower down in the corner with a flower brad in the middle of the flower and then a plain brad. Forgot I even had these. The card next to it has "congratulations" stamped on the four sides of the frame.
 The stamps used on the left are SU and the other one is a animal train stamp from "The Cat's Pajama's". Pretty simple and cute too.
Denise's Birthday Card
My daughter, Denise celebrated her birthday on November 11th. This is the card I made for her. The card base is a pale yellow with a grayish blue layer that I used the Cuttlebug on. The next layer is a piece of designer paper from Basic Grey. I stamped the butterfly on the paper then stamped it again on blue paper. I used a yellow Copic marker on parts of the butterfly then outlined the whole thing with a clear Spica glitter pen. An AMuse happy birthday stamp was used in bottom right corner. I used a tiny piece of foam tape on the back of the butterfly and folded up its wings so it looks like its in flight. I'm just crazy right now about using butterflies in my designs. I just love the way they look. I hope Denise liked her card, I haven't heard from her (she's a busy lady!!)
 I used a tiny piece of foam tape on the back of the butterfly and folded up its wings so it looks like its in flight. I'm just crazy right now about using butterflies in my designs. I just love the way they look. I hope Denise liked her card, I haven't heard from her (she's a busy lady!!)
Granddaughter Emily's 12th Birthday Party
Our granddaughter, Miss Emily Ann Strempke, celebrated her birthday on Saturday November 15th at the clubhouse here at the mobile home park where we live. Her mother, Elizabeth, is my husband's oldest and first born daughter. Emily's actual birthday was the 6th of November. Both of her sisters have had their birthday parties here. There is more room here than at their home. Her theme was crazy hats. Her mother made her birthday cake which is a three layered hat. Elizabeth is the official family cake maker.  The little guy standing next to her is Andy, our youngest grandson. And seated next to him is his sister Melody. Andy is 5 and a half and Melody is almost 8 and a half. One Thursday a month we pick up Andy from school, he's in kindergarten. We've picked up Melody occasionally too when there's been a conflict in schedules. When you're retired you can do things like this. Their mother is Jenni another of my husband's daughters. She has a twin Joyce who is the mother of our two youngest grandchildren and they live in So. California.
 This is the card I made for Emily. It was amazing that all the colors I used on her card were the colors she had in her decorations for her party. The stamps are all SU.
 Here's her table decoration. The craft fair that I am doing on December 12th is at the charter school where Emily goes. She's going to help me with it. Should be fun!!
 The little guy standing next to her is Andy, our youngest grandson. And seated next to him is his sister Melody. Andy is 5 and a half and Melody is almost 8 and a half. One Thursday a month we pick up Andy from school, he's in kindergarten. We've picked up Melody occasionally too when there's been a conflict in schedules. When you're retired you can do things like this. Their mother is Jenni another of my husband's daughters. She has a twin Joyce who is the mother of our two youngest grandchildren and they live in So. California.
 This is the card I made for Emily. It was amazing that all the colors I used on her card were the colors she had in her decorations for her party. The stamps are all SU.
 Here's her table decoration. The craft fair that I am doing on December 12th is at the charter school where Emily goes. She's going to help me with it. Should be fun!!
The Tree In Our Front Yard With Its Beautiful Fall Colors
I took these pictures one beautiful day before we left on our trip to the coast. When we came home, most of the leaves were on the ground. It seemed the leaves had more red in them this year than previous years and so I wanted to get pictures before they were all gone. I love the colors of fall!! I took this first one from the front porch looking towards the street. This one was from across the street looking towards the front door, well it's supposedly the front door. However, it's used to access the bicycle garage which is the screened in front porch. :)

This is also from across the street looking towards the neighbor's. The leaves covered the neighbor's carport at one time. They've been cleaned up since although there are still leaves covering the ground under the tree and the front walkway. The window showing is Gerry's office. My office/craft room is on the other side of the 20 foot flagpole. Both of these rooms were bedrooms that we converted to offices for both of us.

 This one was from across the street looking towards the front door, well it's supposedly the front door. However, it's used to access the bicycle garage which is the screened in front porch. :)
This is also from across the street looking towards the neighbor's. The leaves covered the neighbor's carport at one time. They've been cleaned up since although there are still leaves covering the ground under the tree and the front walkway. The window showing is Gerry's office. My office/craft room is on the other side of the 20 foot flagpole. Both of these rooms were bedrooms that we converted to offices for both of us.

An Anniversary Card and My Version
My daughter, Denise has done scrapbooking for years. She is a Creative Memories consultant. Occasionally she has made some cards too and they are always beautiful. On a recent trip to Fayetteville, NC where they lived for several years (they now live in Enterprise, AL), she and a friend made about 40 different cards. When I asked her to show me some, she didn't respond to my request. For our anniversary she sent us the beautiful card on the left in this picture. I looked at it and thought I could do something like that too. When I emailed her to thank her and compliment her on her card, she told me the designer paper was from Basic Grey. So I went through my stuff and decided on the design on the right. The designer paper on my card is also from Basic Grey. The stamp used in the square is from a SU set. I forgot to ask her how she did the flourish on her card. Unfortunately, I don't have anything like that. The colors in my card are greens, blues, rust and a dark red. I put a bronze charm in the right hand corner that says "Inspire". The colors in her card are blacks, orange and some gray. The black brads that she used look like they have some glitter in them. We both used a black card base.. So what do you think. I think they are both great!
She called a few days later and my husband answered the phone. He told her I made the comment that "my daughter was trying to outdo her mother". I'm not sure that is what I said, however, she laughed and said "all crafters copy each other"!! That is probably very true in some instances. I need to take a picture of another card she sent me, probably part of the 40 or so cards she and her friend made. I'll post that one later. My card is for sale at $4.00.
 I looked at it and thought I could do something like that too. When I emailed her to thank her and compliment her on her card, she told me the designer paper was from Basic Grey. So I went through my stuff and decided on the design on the right. The designer paper on my card is also from Basic Grey. The stamp used in the square is from a SU set. I forgot to ask her how she did the flourish on her card. Unfortunately, I don't have anything like that. The colors in my card are greens, blues, rust and a dark red. I put a bronze charm in the right hand corner that says "Inspire". The colors in her card are blacks, orange and some gray. The black brads that she used look like they have some glitter in them. We both used a black card base.. So what do you think. I think they are both great!
She called a few days later and my husband answered the phone. He told her I made the comment that "my daughter was trying to outdo her mother". I'm not sure that is what I said, however, she laughed and said "all crafters copy each other"!! That is probably very true in some instances. I need to take a picture of another card she sent me, probably part of the 40 or so cards she and her friend made. I'll post that one later. My card is for sale at $4.00.
Thursday, November 20, 2008
Holiday Gift Fair, Part II
Here is Part II of the Holiday Gift Fair....
Cards:
These cards are available for $4.00 each. If purchasing 2 or more cards, they are $3.50 each.
 This card can be used as a birthday card or any other occasion that is being celebrated. The card base is teal with a black layer and then a Kraft layer that I used my Cuttlebug on. I embossed an inch or so on the top and bottom and left an open space where the "Celebrate" is stamped. I turned the layer over and on my cutter scored two narrow lines where the embossing ended on both the top and bottom. I finished it off with a stitched turquoise ribbon from A Muse.
 These are 2 Asian cards that I made some time ago. The one on the left is a red card base. The three squares are layered with black, red and white. The white layer was stamped with three different Kanji stamps. There is a black strip on the right of the card that I put a sheer gold ribbon over. The card on the right has a black card base with a gray layer that I stamped a Japanese writing stamp on in black ink. The butterfly was first stamped on the gray layer then stamped again on a piece of Washi paper and cut out. I backed the Washi with a piece of heavier paper to give it some body. It was then placed over the stamped butterfly with foam tape. A small section of the Japanese writing stamp was stamped with white ink onto the black strip and a small scalloped circle with a sentiment was placed over the strip using foam tape. I first made this particular card in an Asian card class at The Paper Garden.
 Two more Asian cards. The card on the left has a light green card base. (I apologize again for my poor picture taking, it's hard to see what's on the card. And too, the cards are in clear protective sleeves. I should have taken them out.) The stamps used are from a Kodomo clear stamp set using their watercolor stamp pads. One of the stamps was used on the green layer. Then there is a narrow gold and red layer that has a chop stamp on the bottom of the red layer. Another piece of gold backs the ivory layer that has a pagoda stamped on it again using a Kodomo watercolor stamp pad. These stamp pads have several different colors on each pad. Then a piece of sheer ribbon with an Asian coin is wrapped around the gold and ivory layer. This card was also first made in an Asian card class. The card beside it has an ivory card base that has tiny dots all over it. The squares are black, gold and a piece of Washi paper. I cut out a piece of cardboard and covered it with the Washi so it looks puffy. I adhered a black tassel behind the Washi square. A tiny piece of Washi is placed under the gold layer.
 Both of these are birthday cards. The one on the left has an olive green card base, then a pink layer and then a white layer that I used the Cuttlebug on. I repeated the layers again and stamped a flower on the white layer with Happy Birthday in the bottom corner. I used Copic markers on the flower, two different pinks and two different greens. I tied a sheer pink polka dot ribbon over the larger layers. I also rounded the corners on the layers. A very girly looking card. The card beside it has a light aqua card base. If I remember correctly, the top layer is Groovy Guava by SU that I cuttlebugged. The bottom layer is DP. I then used a black layer and a white layer that I stamped a flower vase from a SU set. I used SU markers to color it. SU's ticket corner punch was used and I rolled the white layer in Groovy Guava ink. The ribbon is AMuse. The oval was rolled through Groovy Guava ink also and used an AMuse birthday stamp.
 This card was made using stamps from Memory Box. I actually CASED the card using a different color scheme than is used on the sample on their website. When I first saw the card at The Paper Garden I just had to have the stamps. I have a "thing" right now for butterflies! :) The card base is purple then an ivory layer. On most of the card samples from Memory Box, an ivory layer is used and then it is sponged with Versamagic Gingerbread ink using a dauber. I need lots of practice doing this technique, however, I sure like the way it looks. Then I used a pink color and tried to daub a rectangle where I wanted the first stamp to go. I actually measured out the area and I think it came out ok. I stamped the word stamp that includes the butterfly first in black ink over the rectangle. Then I stamped it again on a scrap piece of white, colored in the butterfly using 2 different purples then cut it out. I mounted it over the stamped butterfly with foam tape. The second stamp is the two small butterflies and flowered branch. I colored in the flowers with a dark pink. I absolutely love this card and think it came out as good as the Memory Box website sample. :)
 This Christmas card has a red card base. The black layer was cuttlebugged. The smaller red layer is Stardream red so it has some shimmer to it. I have had this candle stamp for some time and forgot I even had it. It's amazing what you find when you go looking through your stash. I used Copic markers to color it in then went all over it with a clear Spica glitter pen. I think I ruined it by doing that. It's hard to see that the candle is red. I used red crystals for the holly berries then tied white sheer ribbon at the bottom.
 The stamp used on this Christmas card is from a SU set. The card base is Christmas red with black and white layers. I used Copic markers to color, then again used a clear Spica glitter pen. I used gold Stickles on the streamers, around the edge of the square and the middle of the poinsettia.
 The stamp used here is from the same set as the previous card. The berries were colored in with red Stickles and gold Stickles used around the edge of the square and the streamers. The card base is a Christmas green with black and white layers. The sentiment is from the same set.
 The next two Christmas cards are also from Memory Box. The card base on this one is burgundy with the ivory layer. I used the same technique as the butterfly card, daubing it with Versamagic Gingerbread ink. The word block was stamped in brown. I also stamped the reindeer in brown and then colored it with Copic Light Walnut marker. I used a red crystal for its nose.
 On this card, the card base is a dark brown with an ivory layer. I stamped the tree with Versamark then embossed it with gold embossing powder. The same reindeer was used and colored with Copic Light Walnut marker. I colored in the nose with a Copic Strong Red marker. Both of these cards are very classic looking.
Journals: These can be used for many different purposes. They are made using the black and white composition books that we used in school. I made one of these for myself some time ago that I am using to write the directions for the cards I make. Mine did not turn out as well as these did. I found a tutorial online that was so easy to use. They are completely covered front and back, and inside too. I included a ribbon to be used as a page marker. I am selling them for $8.00 and can be made in different color choices.
 This one is yellow, green and turquoise stripes. The piece covering the binding is green with white circles. The inside is covered with yellow and the ribbon is green edged in yellow.
 This one is two different turquoise patterns. A piece of lavender card stock was adhered to the edge of the two pieces. I wanted to use ribbon there, however, it was after I had already adhered the inside layer and didn't want any raw edges to be shown. Any future ones I make will have ribbon to cover the two seams. The inside is lined with turquoise. The page marker is striped lavender and turquoise ribbon.
 This was my favorite and was the only one I sold. I may have more of this paper left that I could possibly make another one. The pattern repeats on the back. It has an ivory background with black dots then the pattern is coral. The piece on the binding is the coral with white dots. The inside is lined with beige and has an ivory page marker.
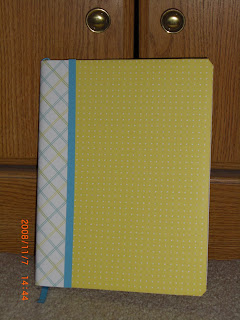 This one is yellow with white dots and the binding is the same stripped cardstock used on the first journal. A strip of turquoise is placed where the two pieces join and the page marker is turquoise ribbon. The inside is lined with yellow.
 This last one is covered with mauve that has tiny white squares on it. The binding is beige with mauve and orange flowers and sage green. There is a strip of sage green over the two pieces and the page marker is sage green. The inside was covered with mauve.
Shopping List Notebooks: I am selling these for $3.00. If two or more are purchased, they are $2.75 each. They can also be made in different choices.
 Unfortunately this one is sold. It is purple with a patterned purple designer paper panel on the front and inside the front cover. It's tied with a lavender ribbon. I may be able to make another one that is similar. The designer paper may be different.
 This is also sold. It has a black cover with designer paper in ivory with a black pattern. Black ribbon ties it shut.
 This one is also sold. It has a lavender base with a striped designer paper in pinks, greens, lavender and turquoise. The ribbon is sheer polka dot lavender. I think I still have some of this paper left.
 This one is available. It has a burgundy base and the designer paper is a grayish blue with burgundy, white, olive green and yellow circles and dots. It's tied with a light brown ribbon.
 This is another sold one. The base is a sage green. The designer paper is ivory background with different shades of pink roses and sage green leaves. I think I have more of this paper too. I used a dark pink ribbon to close it with. This one is my favorite.

 I didn't realize I uploaded these two same ones. At any rate, the first one is red with a beige color designer paper. It has a musical score on it. The butterfly was colored using different fall colors, browns and gold and tied with a red ribbon. The next one has a blue cover. The striped paper has blues, yellow, and a dark pink in it. The birds were colored in blue. The next one is a hot pink. The designer paper has pink, green and a lighter pink circles. The last one I believe was explained above.
 Here is one of them opened up. This picture is so bad, its hard to tell.
Bookmarks: These were made from pieces of cardstock that were left over after making the Baby Shower Invitations that I posted in an older post. Ivory cardstock was used for the stamp and sentiment and then backed with a piece of colored cardstock. The corners were rounded. Then they were laminated, holes punched in them at the top, the corners rounded and then coordinating ribbon tied through the hole at the top. This project was a me, husband and friend Michelle project. Michelle stamped and backed the majority of them. I then borrowed her laminating machine after she found the pouches online and I ordered them so that my husband could laminate all of them. There were 89 total. He helped reluctantly; they would not have been finished if he had not helped me. I thanked him for his efforts and hope he realizes how much I appreciated his help. I then rounded the corners and he punched the holes in the top so I could tie the ribbons. I even snuck a few with me when we went on our trip to PG so I could tie ribbons. There are several of most of the designs in different color combinations. I am selling them for $2.00 or 2 or more for $1.75.
 A dark green tree backed with dark green, a gray watering can with flowers backed in a bright pink and madonna and child stamped in blue and backed with blue.
 Christmas dove backed with turquoise, puppy in a shoe stamped in brown and backed with brown, wishing well with purple flowers backed with purple, purple flower in vase backed with purple.
 Red Roses backed with red, blue snowflakes backed with blue, Santa and his reindeer backed with red and herb pots backed in dark green. Because these designs go sideways, I did not put ribbons on them.
 Bird on a tree stump, another wishing well, teddy bear in stocking and a trio of trees.

 I goofed again. I don't know how to delete a picture. Need to find out how to do that. If anyone knows, holler ok!! Violets done in purple, a daffodil done in purple, flowers done in hot pink and a branch of cherry blossoms done in dark pink.
Cards:
These cards are available for $4.00 each. If purchasing 2 or more cards, they are $3.50 each.
 This card can be used as a birthday card or any other occasion that is being celebrated. The card base is teal with a black layer and then a Kraft layer that I used my Cuttlebug on. I embossed an inch or so on the top and bottom and left an open space where the "Celebrate" is stamped. I turned the layer over and on my cutter scored two narrow lines where the embossing ended on both the top and bottom. I finished it off with a stitched turquoise ribbon from A Muse.
 These are 2 Asian cards that I made some time ago. The one on the left is a red card base. The three squares are layered with black, red and white. The white layer was stamped with three different Kanji stamps. There is a black strip on the right of the card that I put a sheer gold ribbon over. The card on the right has a black card base with a gray layer that I stamped a Japanese writing stamp on in black ink. The butterfly was first stamped on the gray layer then stamped again on a piece of Washi paper and cut out. I backed the Washi with a piece of heavier paper to give it some body. It was then placed over the stamped butterfly with foam tape. A small section of the Japanese writing stamp was stamped with white ink onto the black strip and a small scalloped circle with a sentiment was placed over the strip using foam tape. I first made this particular card in an Asian card class at The Paper Garden.
 Two more Asian cards. The card on the left has a light green card base. (I apologize again for my poor picture taking, it's hard to see what's on the card. And too, the cards are in clear protective sleeves. I should have taken them out.) The stamps used are from a Kodomo clear stamp set using their watercolor stamp pads. One of the stamps was used on the green layer. Then there is a narrow gold and red layer that has a chop stamp on the bottom of the red layer. Another piece of gold backs the ivory layer that has a pagoda stamped on it again using a Kodomo watercolor stamp pad. These stamp pads have several different colors on each pad. Then a piece of sheer ribbon with an Asian coin is wrapped around the gold and ivory layer. This card was also first made in an Asian card class. The card beside it has an ivory card base that has tiny dots all over it. The squares are black, gold and a piece of Washi paper. I cut out a piece of cardboard and covered it with the Washi so it looks puffy. I adhered a black tassel behind the Washi square. A tiny piece of Washi is placed under the gold layer.
 Both of these are birthday cards. The one on the left has an olive green card base, then a pink layer and then a white layer that I used the Cuttlebug on. I repeated the layers again and stamped a flower on the white layer with Happy Birthday in the bottom corner. I used Copic markers on the flower, two different pinks and two different greens. I tied a sheer pink polka dot ribbon over the larger layers. I also rounded the corners on the layers. A very girly looking card. The card beside it has a light aqua card base. If I remember correctly, the top layer is Groovy Guava by SU that I cuttlebugged. The bottom layer is DP. I then used a black layer and a white layer that I stamped a flower vase from a SU set. I used SU markers to color it. SU's ticket corner punch was used and I rolled the white layer in Groovy Guava ink. The ribbon is AMuse. The oval was rolled through Groovy Guava ink also and used an AMuse birthday stamp.
  This card was made using stamps from Memory Box. I actually CASED the card using a different color scheme than is used on the sample on their website. When I first saw the card at The Paper Garden I just had to have the stamps. I have a "thing" right now for butterflies! :) The card base is purple then an ivory layer. On most of the card samples from Memory Box, an ivory layer is used and then it is sponged with Versamagic Gingerbread ink using a dauber. I need lots of practice doing this technique, however, I sure like the way it looks. Then I used a pink color and tried to daub a rectangle where I wanted the first stamp to go. I actually measured out the area and I think it came out ok. I stamped the word stamp that includes the butterfly first in black ink over the rectangle. Then I stamped it again on a scrap piece of white, colored in the butterfly using 2 different purples then cut it out. I mounted it over the stamped butterfly with foam tape. The second stamp is the two small butterflies and flowered branch. I colored in the flowers with a dark pink. I absolutely love this card and think it came out as good as the Memory Box website sample. :)
 This Christmas card has a red card base. The black layer was cuttlebugged. The smaller red layer is Stardream red so it has some shimmer to it. I have had this candle stamp for some time and forgot I even had it. It's amazing what you find when you go looking through your stash. I used Copic markers to color it in then went all over it with a clear Spica glitter pen. I think I ruined it by doing that. It's hard to see that the candle is red. I used red crystals for the holly berries then tied white sheer ribbon at the bottom.
 The stamp used on this Christmas card is from a SU set. The card base is Christmas red with black and white layers. I used Copic markers to color, then again used a clear Spica glitter pen. I used gold Stickles on the streamers, around the edge of the square and the middle of the poinsettia.
 The stamp used here is from the same set as the previous card. The berries were colored in with red Stickles and gold Stickles used around the edge of the square and the streamers. The card base is a Christmas green with black and white layers. The sentiment is from the same set.
 The next two Christmas cards are also from Memory Box. The card base on this one is burgundy with the ivory layer. I used the same technique as the butterfly card, daubing it with Versamagic Gingerbread ink. The word block was stamped in brown. I also stamped the reindeer in brown and then colored it with Copic Light Walnut marker. I used a red crystal for its nose.
 On this card, the card base is a dark brown with an ivory layer. I stamped the tree with Versamark then embossed it with gold embossing powder. The same reindeer was used and colored with Copic Light Walnut marker. I colored in the nose with a Copic Strong Red marker. Both of these cards are very classic looking.
 The other cards that I have available can be found in older posts here on my blog. I didn't want to repeat posting them.
Journals: These can be used for many different purposes. They are made using the black and white composition books that we used in school. I made one of these for myself some time ago that I am using to write the directions for the cards I make. Mine did not turn out as well as these did. I found a tutorial online that was so easy to use. They are completely covered front and back, and inside too. I included a ribbon to be used as a page marker. I am selling them for $8.00 and can be made in different color choices.
 This one is yellow, green and turquoise stripes. The piece covering the binding is green with white circles. The inside is covered with yellow and the ribbon is green edged in yellow.
 This one is two different turquoise patterns. A piece of lavender card stock was adhered to the edge of the two pieces. I wanted to use ribbon there, however, it was after I had already adhered the inside layer and didn't want any raw edges to be shown. Any future ones I make will have ribbon to cover the two seams. The inside is lined with turquoise. The page marker is striped lavender and turquoise ribbon.
 This was my favorite and was the only one I sold. I may have more of this paper left that I could possibly make another one. The pattern repeats on the back. It has an ivory background with black dots then the pattern is coral. The piece on the binding is the coral with white dots. The inside is lined with beige and has an ivory page marker.
 This one is yellow with white dots and the binding is the same stripped cardstock used on the first journal. A strip of turquoise is placed where the two pieces join and the page marker is turquoise ribbon. The inside is lined with yellow.
 This last one is covered with mauve that has tiny white squares on it. The binding is beige with mauve and orange flowers and sage green. There is a strip of sage green over the two pieces and the page marker is sage green. The inside was covered with mauve.
Shopping List Notebooks: I am selling these for $3.00. If two or more are purchased, they are $2.75 each. They can also be made in different choices.
 Unfortunately this one is sold. It is purple with a patterned purple designer paper panel on the front and inside the front cover. It's tied with a lavender ribbon. I may be able to make another one that is similar. The designer paper may be different.
 This is also sold. It has a black cover with designer paper in ivory with a black pattern. Black ribbon ties it shut.
 This one is also sold. It has a lavender base with a striped designer paper in pinks, greens, lavender and turquoise. The ribbon is sheer polka dot lavender. I think I still have some of this paper left.
 This one is available. It has a burgundy base and the designer paper is a grayish blue with burgundy, white, olive green and yellow circles and dots. It's tied with a light brown ribbon.
 This is another sold one. The base is a sage green. The designer paper is ivory background with different shades of pink roses and sage green leaves. I think I have more of this paper too. I used a dark pink ribbon to close it with. This one is my favorite.
 I didn't realize I uploaded these two same ones. At any rate, the first one is red with a beige color designer paper. It has a musical score on it. The butterfly was colored using different fall colors, browns and gold and tied with a red ribbon. The next one has a blue cover. The striped paper has blues, yellow, and a dark pink in it. The birds were colored in blue. The next one is a hot pink. The designer paper has pink, green and a lighter pink circles. The last one I believe was explained above.
 Here is one of them opened up. This picture is so bad, its hard to tell.
Bookmarks: These were made from pieces of cardstock that were left over after making the Baby Shower Invitations that I posted in an older post. Ivory cardstock was used for the stamp and sentiment and then backed with a piece of colored cardstock. The corners were rounded. Then they were laminated, holes punched in them at the top, the corners rounded and then coordinating ribbon tied through the hole at the top. This project was a me, husband and friend Michelle project. Michelle stamped and backed the majority of them. I then borrowed her laminating machine after she found the pouches online and I ordered them so that my husband could laminate all of them. There were 89 total. He helped reluctantly; they would not have been finished if he had not helped me. I thanked him for his efforts and hope he realizes how much I appreciated his help. I then rounded the corners and he punched the holes in the top so I could tie the ribbons. I even snuck a few with me when we went on our trip to PG so I could tie ribbons. There are several of most of the designs in different color combinations. I am selling them for $2.00 or 2 or more for $1.75.
 A dark green tree backed with dark green, a gray watering can with flowers backed in a bright pink and madonna and child stamped in blue and backed with blue.
 Christmas dove backed with turquoise, puppy in a shoe stamped in brown and backed with brown, wishing well with purple flowers backed with purple, purple flower in vase backed with purple.
 Red Roses backed with red, blue snowflakes backed with blue, Santa and his reindeer backed with red and herb pots backed in dark green. Because these designs go sideways, I did not put ribbons on them.
 Bird on a tree stump, another wishing well, teddy bear in stocking and a trio of trees.
 I goofed again. I don't know how to delete a picture. Need to find out how to do that. If anyone knows, holler ok!! Violets done in purple, a daffodil done in purple, flowers done in hot pink and a branch of cherry blossoms done in dark pink.
Subscribe to:
Posts (Atom)


